

Your Guide to Christmas Professional Pictures
Create stunning Christmas professional pictures this holiday season. Get expert tips on wardrobe, lighting, posing, and AI editing for perfect family portraits.
Table of Contents
The secret to truly memorable Christmas professional pictures has nothing to do with having the best camera. It all comes down to having a clear vision. Before you even think about props or poses, you need to decide on the story you want your photos to tell.
Defining Your Christmas Photoshoot Vision
Every great holiday photo starts with a simple idea. Are you dreaming of a cozy, rustic feel, complete with warm blankets and mugs of hot cocoa? Or is a chic, modern look with minimalist decor and elegant outfits more your speed? Nailing this down first is everything, as it guides all your other choices, from wardrobe to location.
Don't overthink it. The best way to start is by creating a mood board. This is just a simple collection of images, colors, and textures that capture the feeling you're after. You can pull one together in minutes using a free tool like Pinterest or even a collage app on your phone.

Building Your Visual Blueprint
Begin by searching for terms that match your ideal theme. Go beyond just "Christmas photos" and get specific. Try phrases like:
- "Cozy cabin Christmas aesthetic": You'll likely find images filled with warm lighting, flannel, and natural touches like pinecones.
- "Minimalist holiday portraits": This will pull up clean backgrounds, neutral color palettes, and simple, elegant clothing.
- "Playful family Christmas photos": Expect to see bright colors, fun props like tinsel or Santa hats, and lots of candid, laughing moments.
As you find images you love, save them. Once you have about 10-15 pictures, you’ll start seeing a clear pattern in the colors, lighting, and overall mood. This collection is now your creative roadmap. It ensures every element, from the sweaters you pick to the final edits, all works together perfectly. If you're feeling stuck, you can find tons of unique Christmas photo ideas to get the ball rolling.
The global photography services market hit a massive $55.6 billion in 2023. A huge chunk of that comes from the seasonal spike for Christmas professional pictures, which just goes to show how much people value capturing these holiday memories with a polished, intentional approach. You can dig into more photography industry trends on imageretouchinglab.com.
Taking the time to define your vision upfront is what transforms a simple photoshoot into a collection of cherished, artful memories. It’s how you make sure the final images truly capture your family’s personality and the festive spirit you want to remember for years to come.
2. Setting the Scene: Wardrobe, Lighting, and Background
This is where the magic really starts to happen. Your outfits, the lighting you choose, and the backdrop you create are what will elevate your photos from simple snapshots to something truly special.
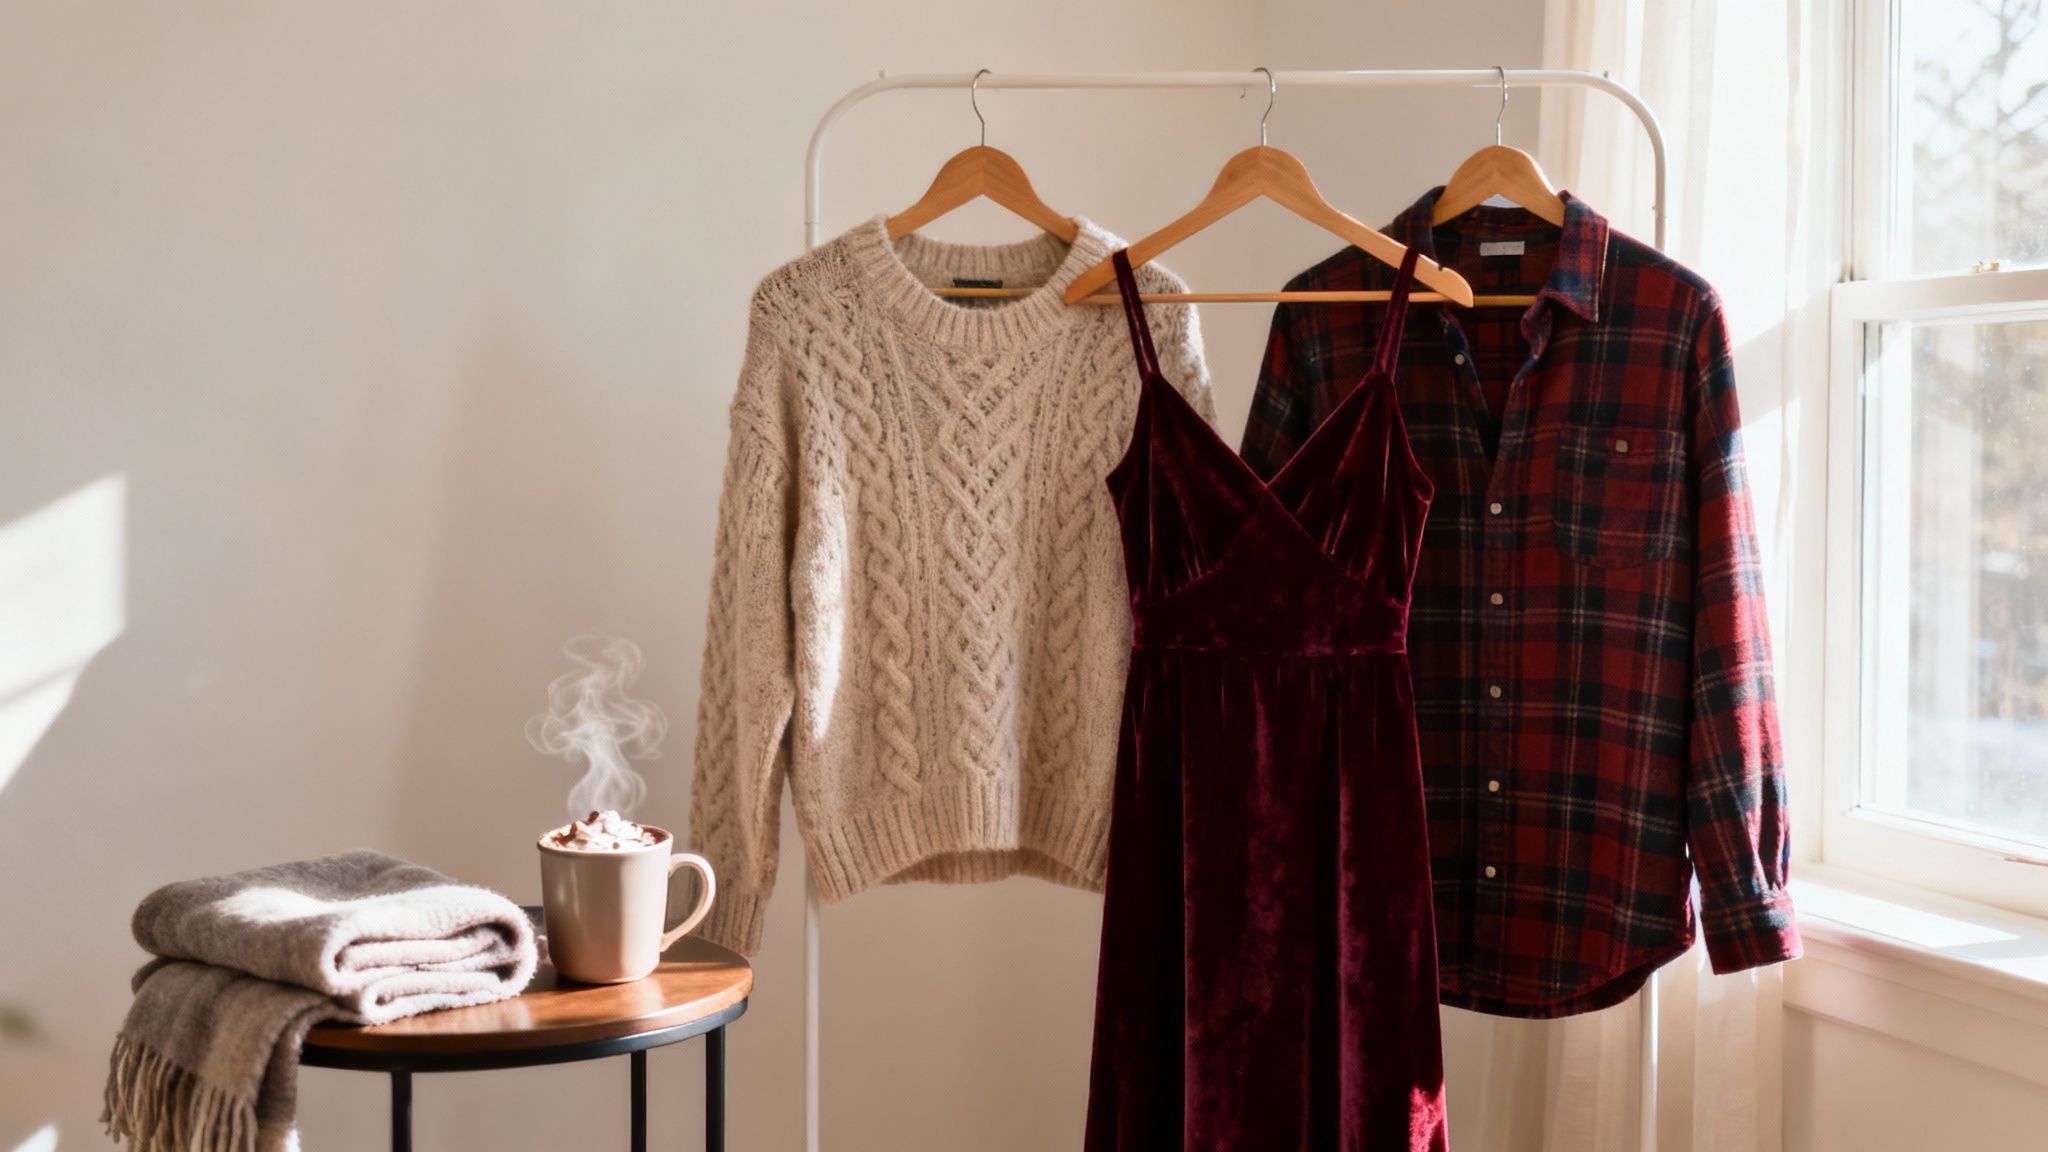
Nailing the Wardrobe
The secret to amazing Christmas professional pictures isn't about everyone wearing identical outfits. It’s about creating a coordinated, harmonious look that feels authentic to your family. My best advice? Focus on a complementary color palette and play with textures.
Forget the pressure to stick with just red and green. Think about richer, more sophisticated combinations like deep burgundy with forest green and cream. Or, you could go for a modern, crisp vibe with icy blues, silvers, and winter whites.
Texture is your best friend for adding depth and a cozy, high-end feel. Picture a soft cashmere sweater paired with a structured wool coat, or a rich velvet dress balanced by the rest of the family in simple cotton shirts. These subtle details make a huge difference and keep the final images from looking flat.
To make this easier, I've put together a quick guide to help you match your wardrobe to some popular Christmas photo themes.
Christmas Photoshoot Theme and Wardrobe Pairings
This quick-reference guide helps you match wardrobe choices with popular Christmas photo themes for a cohesive and professional look.
| Photoshoot Theme | Color Palette | Fabric Suggestions | Example Outfits |
|---|---|---|---|
| Classic Christmas | Red, green, cream, gold | Plaid, wool, flannel, corduroy | Plaid button-downs, chunky knit sweaters, wool skirts, khaki pants. |
| Winter Wonderland | Icy blue, silver, white, gray | Faux fur, sequins, cashmere | White sweaters, silver sequin tops, light gray wool coats, blue velvet. |
| Cozy Cabin | Burgundy, navy, brown, beige | Denim, fleece, shearling, knits | Jeans, cozy fleece pullovers, shearling-lined vests, knit beanies. |
| Modern & Minimalist | Black, white, charcoal, camel | Silk, satin, fine-gauge knits | A simple black dress, tailored camel coat, crisp white shirts. |
Use this table as a starting point, and don't be afraid to mix and match to fit your family's personal style!
Mastering Your Lighting (Without Fancy Gear)
Great lighting is what separates a good photo from a great one. And no, you don't need a studio full of expensive equipment. The most important thing is learning to see and use the light you already have.
For any daytime shoot, natural light from a window is your secret weapon. It’s soft, incredibly flattering, and completely free. Position your family so they are facing a large window, but try to avoid the harsh glare of direct sunlight.
Here's a critical tip: turn off all the overhead lights in the room. They almost always cast a weird yellow or orange tint that will clash with the beautiful, cool tones of the natural daylight, messing up your skin tones. This one small adjustment makes a world of difference.
Want a cozier, evening vibe? You can easily create a warm, inviting glow with lamps you already have at home.
- Start with your main lamp (your key light) and place it slightly off to one side of your subjects. This will create soft shadows and give their faces some dimension.
- Next, grab a smaller lamp (your fill light) and place it on the opposite side to gently soften those shadows.
- If you have a third light, placing it behind your family can create a lovely little halo effect (rim light) that helps them pop from the background.
My Biggest No-No: Whatever you do, avoid the built-in flash on your camera or phone. It’s the fastest way to get harsh, flat light, weird shadows, and the dreaded red-eye. Stick with the ambient light sources you've set up—the result will always look more professional.
If you want to get a little more advanced with your lighting, our guide on headshot lighting setups covers some excellent principles that you can easily adapt for your Christmas photos.
Keeping the Background Clean and Simple
Finally, let's talk about the background. It should always complement the scene, never compete with it for attention. A cluttered or distracting background is a dead giveaway of an amateur photo.
You don’t need a perfectly staged home; you just need one clean, intentional corner.
A simple, festive backdrop can be anything from a decorated fireplace mantel to a plain wall with a single, elegant wreath. One of my favorite tricks is to hang a string of warm, white fairy lights behind the family. When you shoot with a slightly wider aperture, they’ll turn into beautiful, blurry orbs of light known as bokeh.
The goal is to be intentional. Make sure the background aligns with the overall mood you’re trying to create. When your wardrobe, lighting, and background all work together, you’ve set the stage for truly unforgettable pictures.
Posing and Capturing Genuinely Happy Moments
Let's be honest, stiff smiles and awkward poses can kill the vibe of a great Christmas photo. The real magic isn't just getting everyone to look at the camera; it's capturing that genuine connection and the actual joy of the season. It’s time to move past the old "say cheese" routine and start creating moments that are naturally happy.
The best trick I've learned over the years? Give your family an activity. The second people are doing something together, they relax. The focus shifts from "having our picture taken" to simply enjoying each other's company, and that's where the best expressions come from.
Prompts for Genuine Interaction
Think of yourself as a director of fun, not just a photographer telling people where to stand. Here are a few simple, action-oriented prompts that almost always spark real laughter and create beautiful, candid shots:
- Go for a group hug: Tell everyone to get in close and see who can squeeze the tightest. This one is a guaranteed laugh-getter.
- Get the kids involved: Hand the kids a roll of tinsel and challenge them to "wrap up" mom or dad like a Christmas present. The chaos is pure gold.
- Create a quiet moment: Ask everyone to whisper their favorite Christmas memory to the person next to them. You'll get these soft, sweet smiles that are just incredibly heartfelt.
- Add some movement: Put on a favorite holiday song and have a 30-second dance party. A little bit of silliness goes a long way to break the ice.
These prompts give everyone a job to do, letting you capture the natural, unscripted moments that follow. If you're looking for more ways to direct your subjects, these creative portrait photography ideas have some great tips that you can easily adapt for your holiday shoot.
A huge piece of advice from seasoned family photographers is to never stop shooting. The absolute best moments often happen in the seconds just before or after a "posed" shot—that shared glance, the sudden burst of laughter, or a quick, spontaneous hug. Keep that camera ready for the in-between stuff.
Simple Composition for Balanced Photos
You don't need to be a photography whiz to frame a beautiful shot. Just a couple of simple guidelines can help you balance your images and make them look much more professional, whether you’re shooting one person or the whole crew.
The Rule of Thirds is a classic for a good reason. Just picture a 3x3 grid over your screen. Instead of sticking your subject right in the middle, try placing them along one of the lines or where the lines cross. It instantly makes the photo feel more dynamic. For groups, I like to arrange them so their heads form a subtle triangle shape—it’s a neat trick that helps guide the viewer's eye through the picture.
Camera and Smartphone Settings for Sharp Images
Finally, let's talk tech. A few quick tweaks to your settings can make a world of difference in your final photos, helping you get images that are sharp, clear, and vibrant.
If you're using a smartphone, Portrait Mode is your best friend. It does a fantastic job of blurring the background, making your family pop, just like you'd get with a professional camera. It’s perfect for that soft, dreamy look that feels so festive.
To avoid the dreaded blur from shaky hands, use a remote shutter. You can grab a cheap Bluetooth remote online, or just use the self-timer on your phone or camera. Setting a 2-second or 5-second timer gives you enough time to hit the button and get into position without scrambling. It’s a tiny step that makes a huge difference in getting those crisp, clear Christmas pictures you’ll be proud of.
From Good to Unforgettable: Editing with AI
You’ve captured your photos, and now the real magic begins. This is where you transform a good snapshot into a stunning, professional-looking Christmas picture. In the past, this meant wrestling with complex software, but today, intuitive AI tools like YourAIPhotographer can give your photos that polished finish with just a few clicks.
This isn't just a trend for hobbyists, either. The pros are all in. A recent analysis for 2025 found that around 60% of professional photographers rely on AI photo editing to streamline their work. During the hectic holiday season, AI is a lifesaver, helping them manage the surge in demand for professional Christmas pictures without sacrificing quality.
It all boils down to a simple, effective workflow.

As you can see, a great final image starts long before you open an editor—it’s built on a clear concept and confident execution from the very beginning.
The table below breaks down how AI is changing the game, transforming tedious manual tasks into quick, creative adjustments.
AI Editing Workflow for Christmas Photos
A step-by-step comparison of manual editing tasks versus their AI-powered counterparts for efficient and professional results.
| Editing Task | Traditional Method | AI-Powered Solution (e.g., YourAIPhotographer) | Benefit |
|---|---|---|---|
| Background Replacement | Manual masking, complex cutouts, finding stock photos. | Simple prompt-based replacement (e.g., "Add snowy forest"). | Saves hours of meticulous work; generates unique backgrounds. |
| Lighting Correction | Adjusting multiple sliders (exposure, shadows, highlights). | One-click AI Relighting to add or adjust light sources. | Achieves natural-looking light without technical know-how. |
| Object Removal | Tedious cloning and healing brush work. | AI Inpainting to remove distractions seamlessly. | Instantly cleans up cluttered backgrounds or photobombers. |
| Image Resolution | Limited options; often results in pixelation. | AI Upscaling to intelligently increase resolution and detail. | Ensures phone photos are sharp enough for large prints. |
This AI-driven approach lets you focus on the creative vision for your Christmas photos, not the technical hurdles.
Crafting the Perfect AI Prompt
Getting fantastic results from AI editing is all about communication. Think of it like you're directing a highly skilled assistant—the clearer your instructions, the better the outcome. Vague requests lead to generic results.
Let's imagine you've got a great family photo, but the living room background is a mess. A weak prompt just won't cut it.
- Weak Prompt: "Change background to something festive."
- Strong Prompt: "Replace the background with a serene, snowy forest at dusk, with soft, out-of-focus fairy lights twinkling between the evergreen trees."
See the difference? That level of detail gives the AI a clear vision to work with, producing a final image that feels both beautiful and believable. This same logic applies to any adjustment you want to make, from tiny touch-ups to a complete change in style. The way AI for photography is evolving makes this kind of creative control accessible to everyone.
Fixing Light and Enhancing Details
One of the most powerful tools in any modern AI photo editor is AI relighting. Was your photo ruined by harsh shadows on someone's face? Or does the whole image just feel a bit dark and gloomy? AI can analyze the existing light in your shot and let you fix it in a way that looks completely natural.
You can add a warm, golden glow to simulate candlelight or brighten a dim room to make it look like it was filled with beautiful, soft window light. It's a game-changer for correcting common lighting mistakes and dialing in the perfect holiday mood after the fact.
Beyond fixing mistakes, you can also add artistic touches. Learning how to blur background like a pro can make your family pop, giving your photos that high-end portrait feel.
Planning to print your photos? Then AI upscaling is your best friend. This technology intelligently increases the resolution of your image, adding crisp detail without that ugly, pixelated look. It’s the essential last step for turning a great phone picture into a high-quality print you can frame or send as a holiday card.
With these tools at your fingertips, you can sidestep the steep learning curve of traditional software and get right to creating polished, professional-quality Christmas photos that you'll be excited to share.
Sharing and Preserving Your Holiday Portraits
You’ve done the hard work of capturing and editing your photos. Now it's time to get them out into the world and make sure they’re safe for the long haul. This final step—exporting your christmas professional pictures correctly—is what makes them truly shine, whether online or in a frame.
Getting the export settings right is crucial. It's what ensures your images look just as crisp on a printed holiday card as they do in a friend's Instagram feed. Where the photo is going to end up dictates the file format and resolution you'll need.
Optimizing for Print and Social Media
When you’re printing anything, from holiday cards to canvases, you need a high-resolution file. No exceptions. Export your images as a JPEG at 300 DPI (dots per inch) and crank the quality setting all the way up. This is the industry standard for a reason, guaranteeing your prints look sharp and vibrant without any blocky pixelation.
Sharing on social media is a completely different ballgame. Platforms like Instagram and Facebook aggressively compress large images to save space, which can murder the quality and make your photos look soft. To get ahead of this, you should resize the photos yourself before uploading.
- For Instagram: Export your photo with a width of 1080 pixels.
- For Facebook: Aim for a width of 2048 pixels on the longest edge.
By resizing first, you control how the image is processed, not the algorithm. For more on this, our guide to creating stellar social media visual content has plenty of extra tips to make your images pop online.
Pro Tip: I always save two versions of every final image: a full-resolution file for printing and a smaller, web-ready version for online sharing. It's a simple habit that saves a ton of time and prevents you from having to go back and re-export later.
Backing Up Your Cherished Memories
Once your holiday portraits are finished, the last thing you want is to lose them. It happens more often than you'd think. The demand for Christmas-themed sessions is a huge part of the business for professional photographers, which underscores just how much people value these memories. That level of professionalism has to include protecting the final images.
Don't let a crashed hard drive or an accidental deletion wipe out all your work. It's smart to explore the best free cloud storage options for photos to keep them secure. Services like Google Photos or Dropbox offer easy and reliable ways to back everything up, giving you peace of mind that your beautiful memories are protected for years to come.
Common Questions About Christmas Photoshoots
Planning your Christmas professional pictures always brings up a few questions. I get them all the time. From figuring out the best time to book to wondering how on earth to get your kids to cooperate, let's walk through the most common ones so you can feel completely prepared.
When Is the Best Time to Take Christmas Pictures?
Honestly, the sooner the better. To completely sidestep the holiday rush, I always recommend scheduling your photoshoot in late October or early November.
This timeframe gives you plenty of breathing room. You'll have time to see the edited photos, pick your favorites without feeling rushed, and get your holiday cards or prints ordered and delivered long before the December panic sets in. Professional photographers get booked solid starting in November, so getting on their calendar early saves you a major headache.
How Do I Get Natural Smiles from My Kids?
This is the golden question! The real secret is to stop asking for smiles. The moment you say "say cheese," you get that forced, unnatural grin. Instead, you have to make them forget they're even in a photoshoot.
Turn it into a game. Here are a few tricks I've seen work like magic:
- Ask them to whisper a silly secret in your ear.
- Challenge them to a "who can make the silliest snowman face" contest.
- Give them some tinsel and tell them to try and wrap up a parent.
When you create an activity, you get real, authentic moments of joy and laughter. And a pro tip? Keep the session short and sweet, and always have their favorite snacks ready to go. A happy, well-fed kid is a cooperative kid.
If there's one piece of advice I can give, it's this: frame the photoshoot as a special, fun family activity, not a chore. Let them know how excited you are. That genuine excitement is contagious and will absolutely shine through in the final photos.
What Should I Do About Bad Indoor Lighting?
Lighting is everything in a photo, but you don't need a pro studio to get it right. Natural light is your best friend, hands down.
Set up your shot near a large window during the daytime. The most important step? Turn off all the overhead lights in the room. This simple action prevents those weird yellow or orange color casts that mess with skin tones and make everyone look unnatural.
If you absolutely have to shoot at night, try using a few different lamps placed at various angles. This helps soften the light and reduces those harsh, unflattering shadows. And if a photo has already been taken in bad light, don't sweat it. A good AI editing tool can work wonders with a relighting feature, letting you add warmth and brightness to save the shot after the fact.
Ready to turn your holiday snapshots into something truly special? With YourAIPhotographer, you can instantly fix tricky lighting, swap out backgrounds, and upscale your images for stunning prints and social media posts. Start creating your dream Christmas photos today!