

9 Creative Portrait Photography Ideas to Try in 2025
Stuck in a rut? Discover 9 creative portrait photography ideas with practical tips to elevate your photos and capture stunning, unique portraits today.
Table of Contents
Portrait photography is more than just capturing a smile; it's about telling a story, evoking emotion, and revealing the essence of a person. However, it's easy to fall into a routine of standard poses and predictable lighting setups. If you're looking to break free from the conventional and create images that truly stand out, you've come to the right place.
This guide moves beyond basic headshots to explore nine innovative and creative portrait photography ideas, complete with actionable tips and inspirational examples. We will delve into techniques that manipulate light, play with perspective, and use the environment to build a compelling narrative. You will learn specific methods for everything from double exposures and light painting to using environmental storytelling to add depth and context to your shots.
Whether you're a seasoned professional seeking fresh inspiration or an enthusiastic beginner eager to experiment, these concepts will challenge you to think differently. Our goal is to elevate your portraiture from a simple likeness to a genuine work of art. Get ready to transform your approach and capture portraits that are not just seen, but truly felt.
1. Master the Art of Double Exposure Photography
Double exposure is one of the most compelling creative portrait photography ideas for blending narrative into a single frame. This technique involves layering two different images, typically a portrait silhouette and a secondary "filler" image like a landscape or texture, to create a surreal, multi-layered photograph. The result is a portrait that tells a story, suggesting a subject's thoughts, memories, or connection to a specific environment.
This method is perfect for fashion lookbooks, album art, or personal branding where you want to convey a deeper mood or concept. It transforms a standard headshot into a piece of art that viewers will pause to interpret. Photographers like Brandon Woelfel and Christoffer Relander have popularized this style, using it to merge urban and natural worlds with human forms.
How to Create a Double Exposure Portrait
Creating a stunning double exposure can be done both in-camera (if your camera supports it) or with post-processing software like Adobe Photoshop. The core principle remains the same: combining a high-contrast base portrait with a textured second image.
- Shoot Your Base Image: Place your subject against a clean, bright, and evenly lit background like a softbox or an overcast sky. This creates a strong, easily separable silhouette. A profile shot often works best.
- Choose a Filler Image: Select an image with interesting textures, patterns, or scenes. Cityscapes, forests, floral arrangements, or even abstract light patterns work well. This image will "fill" the dark areas of your subject's silhouette.
- Combine and Blend: In post-processing, place the filler image on a layer above your portrait. Use a clipping mask to contain it within the silhouette, and experiment with different blending modes (like "Screen" or "Lighten") to achieve the desired effect. Fine-tune the opacity and positioning until the two images merge seamlessly.
2. Light Painting Portraits
Light painting is one of the most magical creative portrait photography ideas, transforming a dark scene into a vibrant canvas of light. This technique uses a long camera exposure while a photographer or an assistant moves a light source to "paint" streaks, shapes, and patterns around the subject. The result is an ethereal, dynamic portrait where glowing trails of light seem to float in mid-air, creating a truly otherworldly effect.
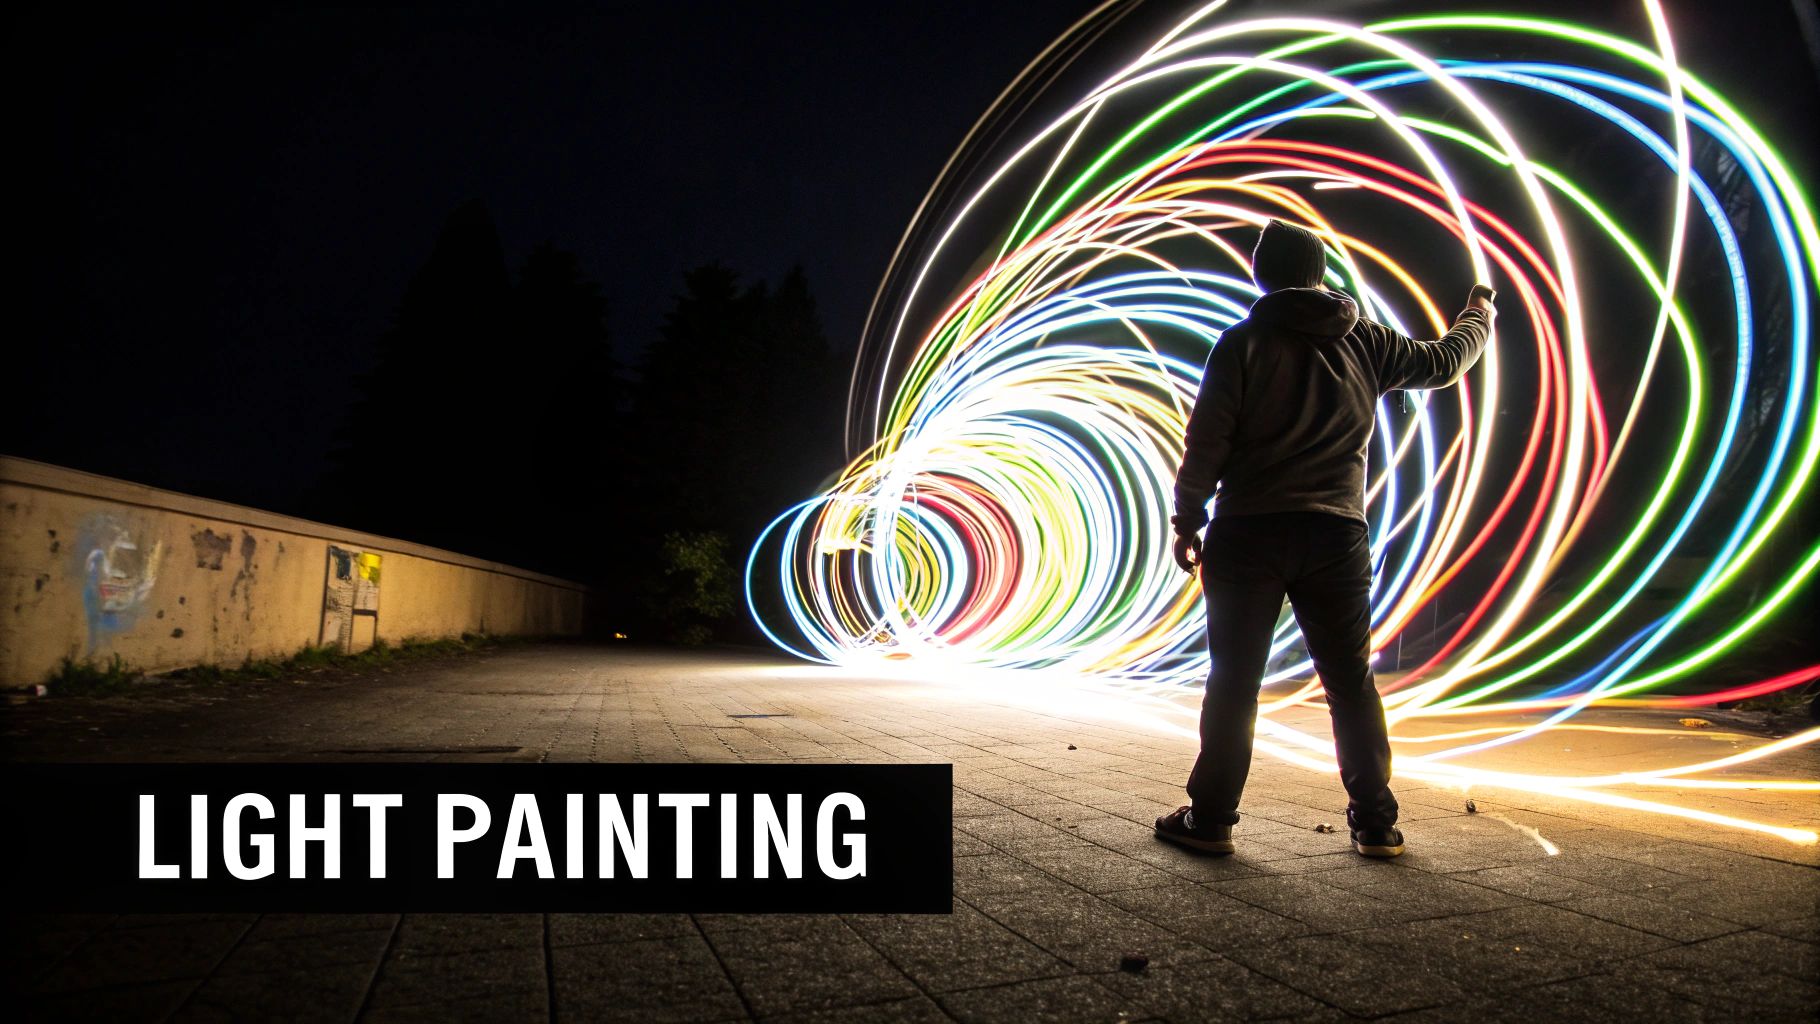
This method is ideal for creating stunning album art, conceptual fine art pieces, or unforgettable social media content that stops the scroll. It adds a layer of motion and energy to a static image, making the final portrait feel alive. Artists like Eric Paré with his signature light tubes and Joel Robison's whimsical self-portraits have mastered this style, proving its power to turn a simple portrait into a breathtaking spectacle.
How to Create a Light Painting Portrait
Creating a light painting portrait requires a dark environment, a camera with manual settings, and a bit of practice. The core idea is to keep your subject perfectly still while you move light sources to draw in the frame during a long exposure.
- Set Up Your Gear: Use a sturdy tripod to eliminate camera shake and a remote shutter or timer to trigger the shot without touching the camera. Set your camera to a long shutter speed (start with 10-30 seconds).
- Position Your Subject: Instruct your subject to remain as still as possible throughout the entire exposure. Any movement will result in motion blur. The photographer should wear dark clothing to avoid being visible in the final image.
- Paint with Light: Once the shutter opens, use your light source (like an LED stick, flashlight, or even steel wool for sparks) to create your desired shapes. Practice your movements beforehand to get them smooth and intentional. Use colored gels over your light source to introduce vibrant hues into your composition.
To get started, explore different light sources and movements to see what unique effects you can achieve. For more inspiration, you can learn more about unique photoshoot ideas to elevate your work.
3. Reflection and Mirror Photography
Reflection and mirror photography is a fantastic creative portrait photography idea that uses reflective surfaces to add depth, symmetry, and intrigue to a portrait. By incorporating mirrors, water, glass, or even polished metal, you can create a composition that offers multiple perspectives, distorted realities, or a profound sense of introspection. The reflection acts as a second layer, telling more of the story within a single frame.
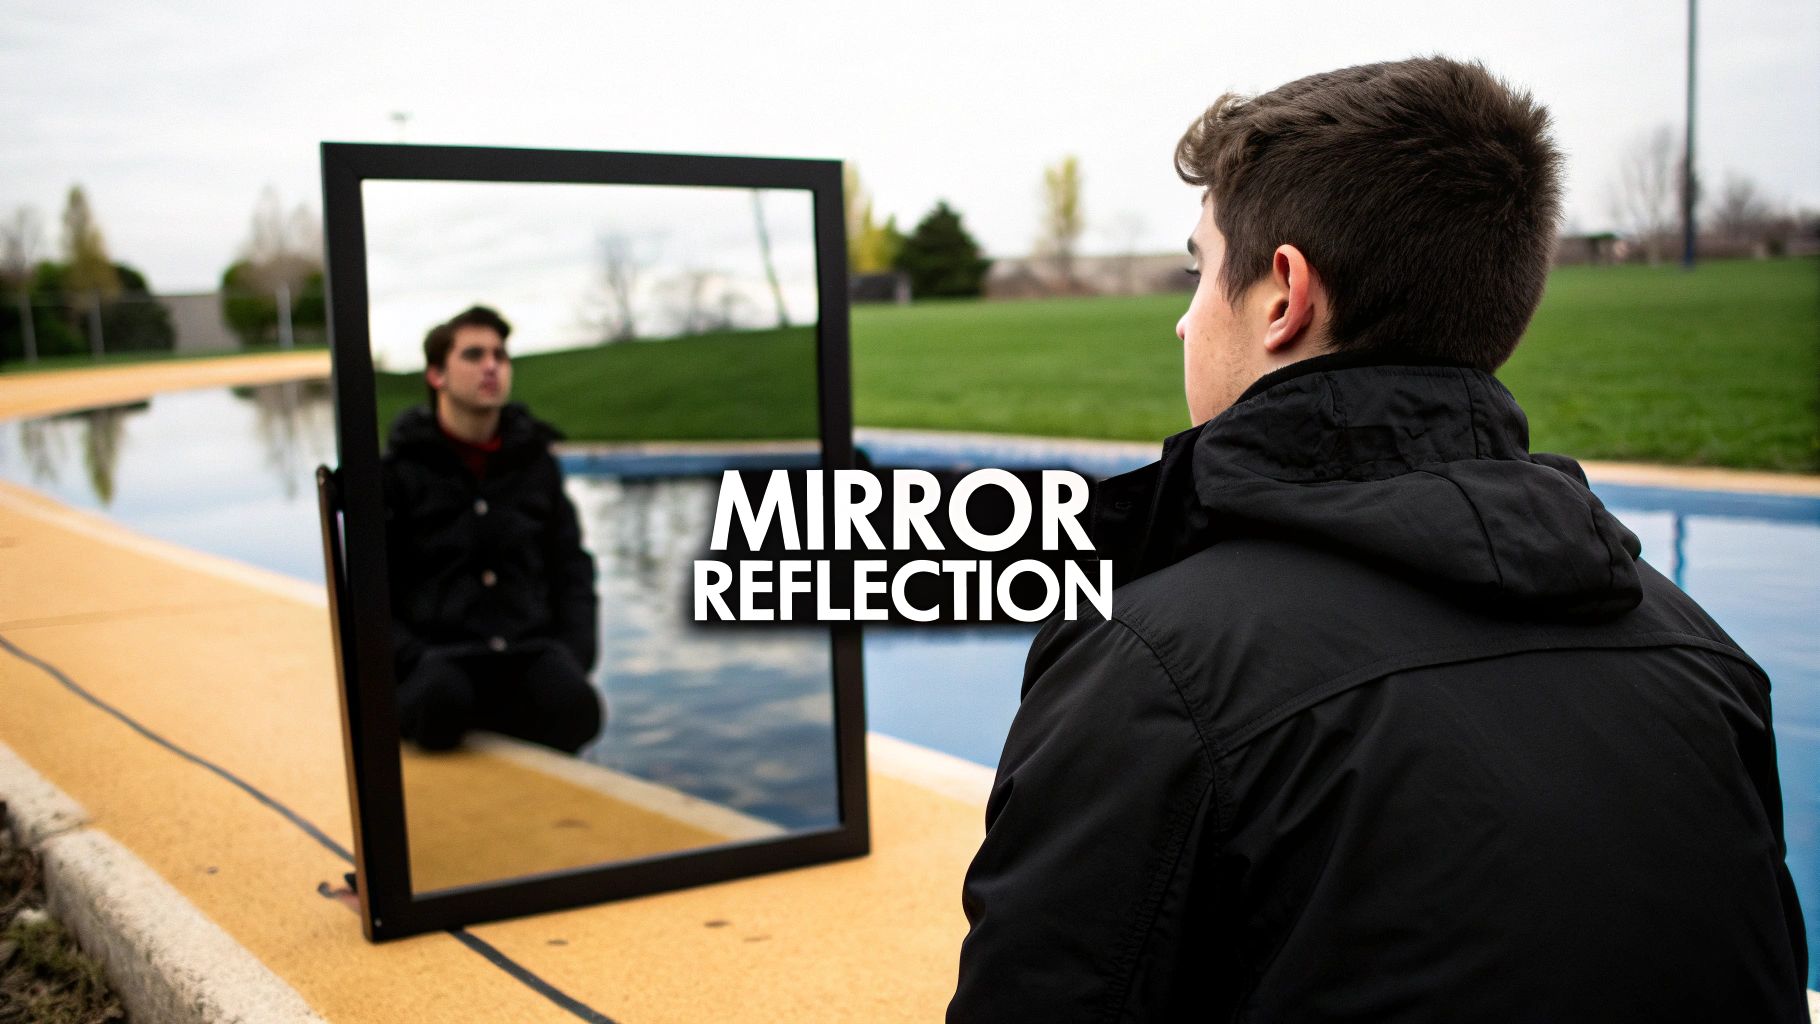
This technique is perfect for conceptual art, moody fashion editorials, or personal branding that aims to convey complexity and self-awareness. It forces the viewer to look closer and question what is real versus what is a reflection. Photographers like Rosie Hardy and Alex Stoddard are renowned for using mirrors and water to create surreal, narrative-driven portraits that feel both cinematic and deeply personal.
How to Create a Reflection Portrait
Capturing compelling reflections involves careful attention to angles, light, and the surface itself. Whether you're using a pristine mirror or a rippling puddle, the goal is to control the reflection to enhance your subject.
- Prepare Your Surface: Ensure your reflective surface is clean unless smudges or dirt are part of your creative concept. For water, wait for a calm moment to get a clear, mirror-like image.
- Master Your Angles: Position yourself and your camera carefully to avoid capturing your own reflection. Shooting from a slight angle to the reflective surface is often the best approach. A longer lens can also help you stay out of the shot.
- Control the Light: Use polarizing filters to manage glare and control which reflections are visible, especially when shooting through glass like a window. Experiment with lighting either the subject, the reflection, or both to create different moods.
- Play with Abstraction: Don't limit yourself to perfect reflections. A broken mirror can create a fragmented, abstract portrait, while a gentle ripple in the water can add a painterly, impressionistic feel.
4. Defy Gravity with Levitation Photography
Levitation photography is one of the most imaginative creative portrait photography ideas, producing images where subjects appear to float, fly, or hover effortlessly. This technique creates a surreal, dreamlike atmosphere that immediately captures attention and sparks curiosity. By cleverly removing supports in post-production, you can craft scenes that defy the laws of physics and tell a magical story.
This method is ideal for conceptual art, high-fashion editorials, or enchanting personal portraits where the goal is to create a visual spectacle. It transforms an ordinary setting into a stage for the extraordinary. Photographers like Joel Robison and Natsumi Hayashi have mastered this style, turning everyday moments into whimsical, gravity-defying works of art.
How to Create a Levitation Portrait
Achieving a convincing levitation effect is a two-part process that combines a smart photoshoot with precise editing. The key is to photograph your subject with support and then photograph the empty background to seamlessly remove that support later.
- Shoot the "Action" Shot: Place your subject on a stable support like a stool, a box, or clear acrylic props. Direct them into a floating pose, paying attention to how their hair and clothing would naturally fall or flow if they were actually in the air.
- Capture a "Clean Plate": After you get the perfect shot of your subject, remove them and the support from the frame without moving your camera. Take a photo of the empty background. This "clean plate" is crucial for the editing phase.
- Combine and Erase: In a program like Adobe Photoshop, layer the "action" shot on top of the "clean plate." Use a layer mask to carefully paint over the support structure, revealing the empty background underneath. This makes the prop vanish, creating the illusion that your subject is floating.
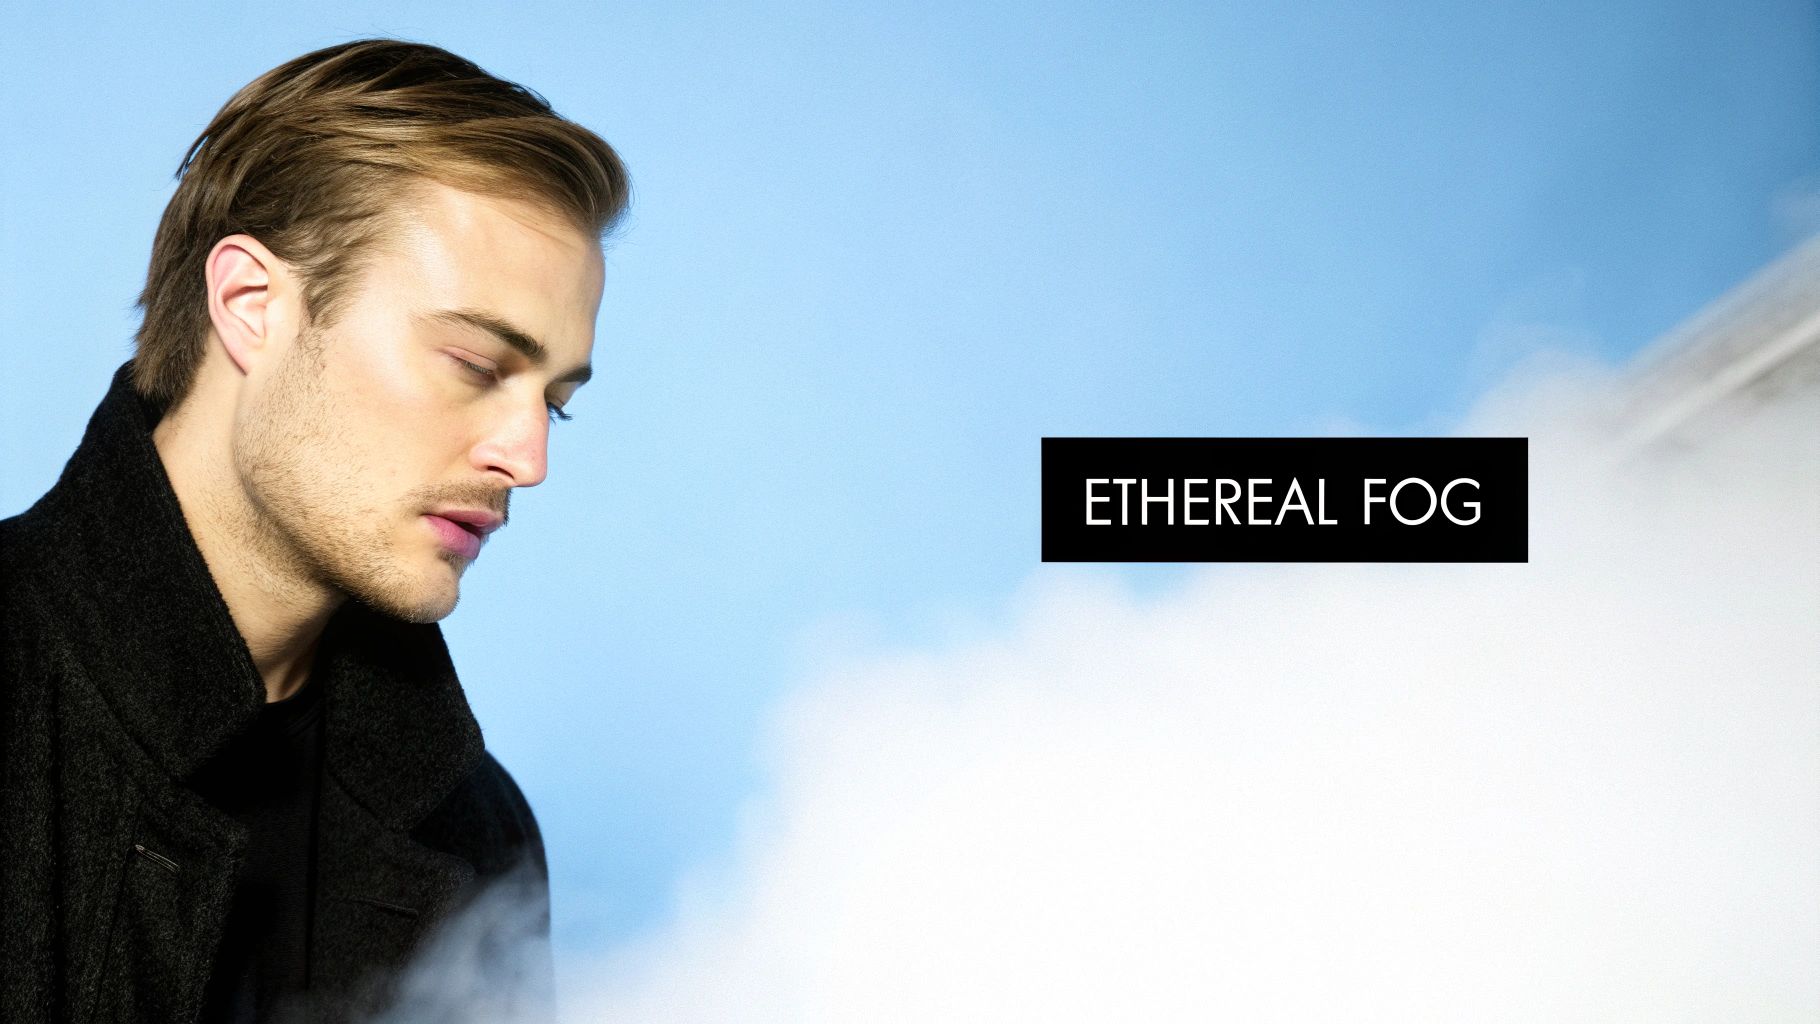
5. Smoke and Fog Photography
Incorporating atmospheric elements like smoke and fog is one of the most effective creative portrait photography ideas for instantly adding mood and drama. This technique uses smoke bombs, fog machines, or natural mist to create a sense of mystery, obscuring parts of the scene while selectively revealing the subject. The result is a portrait that feels cinematic, ethereal, and emotionally charged, drawing the viewer’s focus to specific details.
This approach is ideal for fine art portraits, fantasy-themed shoots, or edgy fashion editorials where the goal is to build a compelling atmosphere. It turns a simple background into a dynamic, textured environment that enhances the narrative. Photographers like Annie Leibovitz and Tim Walker have masterfully used these elements to create iconic, dreamlike portraits that transport the viewer to another world.
How to Create a Smoke or Fog Portrait
Whether you are in a studio with a fog machine or outdoors with a smoke bomb, the key is to control the light to shape the atmosphere. Backlighting is crucial for making the smoke or fog particles visible and giving them texture and depth.
- Set Up Your Lighting: Position a light source behind your subject, pointing toward the camera. This backlight will illuminate the edges of the fog or smoke, separating your subject from the background and making the effect "pop."
- Introduce the Atmosphere: If using a fog machine, release short bursts to avoid overwhelming the scene. For smoke bombs, be mindful of wind direction and have an assistant help position the smoke. Work quickly, as these effects are temporary and unpredictable.
- Direct Your Subject: Guide your model to interact with the smoke or fog. They can walk through it, let it swirl around them, or use their hands to gently shape it. This interaction adds a dynamic and authentic feel to the final image.
- Experiment with Color: Place colored gels over your backlight to tint the smoke or fog, creating surreal, vibrant effects that can dramatically alter the mood from mysterious and cool to warm and energetic. Always ensure proper ventilation when working indoors.
6. Bokeh and Shallow Depth of Field
Using bokeh and a shallow depth of field is one of the most classic yet effective creative portrait photography ideas for making your subject pop. This technique uses a wide aperture to blur the background into a creamy, non-distracting canvas, drawing the viewer's complete attention to the sharply focused subject. The result is a dreamy, professional-looking portrait where background lights transform into beautiful, soft orbs of light known as bokeh.
This method is ideal for almost any portrait scenario, from professional headshots and engagement photos to fashion editorials and casual lifestyle shoots. It excels at isolating subjects from busy environments, turning a cluttered street or mundane park into a stunning, artistic backdrop. Photographers like Peter McKinnon and Brandon Woelfel have mastered this look, using it to create portraits with a signature cinematic and magical quality. For more tips on this style, you can learn more about how to take aesthetic pictures on youraiphotographer.com.
How to Create a Bokeh-Rich Portrait
Achieving beautiful bokeh is a matter of managing your aperture, focus, and the distance between your subject, camera, and background. It's a technical skill that produces deeply artistic results with the right setup.
- Use the Widest Aperture: Set your lens to its widest possible aperture, such as f/1.4, f/1.8, or f/2.8. A wider aperture (a smaller f-number) creates a shallower depth of field, which is essential for maximizing background blur.
- Create Distance: Physically increase the distance between your subject and the background. The further the background is from your subject, the more out-of-focus and blurred it will become.
- Incorporate Light Sources: To create visible bokeh circles, position your subject in front of distant light sources. String lights, city lights at night, or sunlight filtering through leaves are perfect for this.
- Focus Precisely on the Eyes: With such a shallow depth of field, precise focus is critical. Always set your focus point directly on your subject's eyes to ensure the most important feature is perfectly sharp.
7. Silhouette Photography
Silhouette photography is a powerful creative portrait photography idea that uses contrast to create mystery and drama. This technique involves placing your subject in front of a bright light source and exposing for the background, which causes the subject to appear as a dark, solid shape. The beauty of a silhouette lies in its ability to emphasize form, gesture, and emotion through posture alone, stripping away facial expressions to tell a story with pure shape.
This method is ideal for capturing dramatic moments during golden hour, creating intimate maternity photos, or adding a sense of anonymity and universal emotion to a portrait. It shifts the focus from who the person is to what they are doing or feeling. Photographers like Fan Ho and Henri Cartier-Bresson masterfully used silhouettes to capture the human form against the backdrop of life, proving that what is not seen can be as compelling as what is.
How to Create a Silhouette Portrait
The key to a successful silhouette is controlling the light. You need a background that is significantly brighter than your subject, forcing your camera to underexpose the foreground. This can be achieved with natural or artificial light sources.
- Position Your Subject: Place your subject directly between your camera and a strong light source, like a setting sun, a bright window, or a studio light. This setup ensures they are backlit and fall into shadow.
- Expose for the Background: Set your camera to manual mode. Aim your camera at the brightest part of the background (avoiding the direct sun) and adjust your settings until it is properly exposed. Your subject should naturally become dark.
- Focus on a Recognizable Shape: Since you lose detail, the outline is everything. Encourage your subject to create clear, defined poses. Profile views, outstretched arms, or dynamic movements work well because they create an interesting and unambiguous shape.
- Use a Wide Aperture for Focus: While you expose for the background, ensure your subject is in sharp focus. Using a wider aperture (like f/4 or f/5.6) can help create a clean separation while keeping the silhouette crisp.
8. Creative Color Theory and Gels
Using colored lighting gels is one of the most dynamic creative portrait photography ideas for injecting mood and energy into a scene. This technique involves placing colored films (gels) over your light sources to cast vibrant hues onto your subject and background. By understanding color theory, you can create powerful emotional responses, whether through a calming analogous scheme or a high-impact complementary one.
This method is incredibly popular in music photography, fashion editorials, and any project aiming for a modern, stylized, or cyberpunk aesthetic. It transforms a simple portrait into a visually arresting image that feels intentional and artistic. Influencers like Brandon Woelfel have made this style iconic, using bold blues, magentas, and teals to create dreamy, neon-soaked atmospheres.
How to Use Creative Color Gels
The key to mastering colored lighting is intentionality and balance. Instead of just adding color randomly, you need to think about how different hues interact with each other and with your subject's skin tones.
- Study Color Theory Basics: Start with the color wheel. A complementary scheme (like teal and orange) creates tension and visual pop, while an analogous scheme (like blue and purple) creates harmony and a unified mood.
- Create a Split-Tone Effect: Use two lights, each with a different colored gel, placed on opposite sides of your subject. This creates a striking contrast and is a great way to introduce color without overwhelming the entire image.
- Balance with a White Light: To keep skin tones looking natural, use a main colored light (key light) and a clean, white fill light or rim light. This ensures the subject remains recognizable while still being bathed in a creative color palette.
- Experiment in Post-Processing: You can also enhance or create these effects digitally. Proper color correction for photos is essential to fine-tune hues, saturation, and luminance to achieve the perfect look. You can learn more about color correction techniques here.
9. Environmental Storytelling Portraits
An environmental storytelling portrait tells a story about the subject by placing them within a context that reveals their personality, profession, or passion. Unlike a studio shot, this approach uses the surrounding environment as a narrative tool, transforming the image from a simple depiction of a person into a rich, documentary-style character study. The location and props become integral parts of the story, offering insights into the subject’s life.
This technique is incredibly versatile and powerful for personal branding, editorial features, and commercial projects where authenticity is key. It helps viewers connect with the subject on a deeper level by showing, not just telling, who they are. Photographers like Annie Leibovitz and Arnold Newman are masters of this style, famously capturing celebrities and public figures in spaces that define them, from a writer in their study to a musician in their studio.
How to Create an Environmental Storytelling Portrait
Crafting an effective environmental portrait requires thoughtful planning to ensure the subject and their surroundings work in harmony. The goal is to create a balanced composition where the environment enhances the portrait without overwhelming it.
- Research and Collaborate: Before the shoot, talk to your subject about their hobbies, work, and passions. Ask them what locations or objects are meaningful to them. This collaboration is key to finding an authentic setting.
- Scout the Location: Visit the chosen location in advance to assess the lighting, composition possibilities, and potential distractions. Look for elements that you can incorporate into the frame to add narrative depth.
- Balance Subject and Scene: Use composition and lighting to guide the viewer’s eye. Position your subject as the clear focal point, but allow the environmental details to support their story. Use a wider aperture (f/2.8 to f/5.6) to create some separation while keeping the background recognizable.
- Direct with Purpose: Pose your subject interacting naturally with their environment. An artist holding a paintbrush or a chef tasting a sauce feels more genuine than a static pose. This interaction brings the entire scene to life.
For more inspiration, you can find a wealth of environmental storytelling portraits and other creative photography ideas. You can learn more about photo ideas on youraiphotographer.com to expand your creative toolkit.
Creative Portrait Photography Ideas Comparison
| Technique | Implementation Complexity 🔄 | Resource Requirements ⚡ | Expected Outcomes 📊 | Ideal Use Cases 💡 | Key Advantages ⭐ |
|---|---|---|---|---|---|
| Double Exposure Photography | Medium - requires exposure control and post-processing | DSLR/mirrorless, prime lenses, editing software | Artistic, surreal portraits with storytelling | Creative, expressive portraits; social media | Unique artistic results; strong storytelling |
| Light Painting Portraits | High - long exposure, precise light manipulation | LED sticks, flashlights, tripod, gels | Dramatic, magical light trails and effects | Experimental, creative visual impact | Unlimited creativity; impressive visuals |
| Reflection and Mirror Photography | Medium - careful positioning and lighting | Mirrors, polarizing filters, cleaning supplies | Symmetrical, surreal compositions with depth | Artistic portraits with multiple perspectives | Adds depth and intrigue; accessible materials |
| Levitation Photography | High - multiple shots, careful editing and props | Tripod, remote shutter, props, editing software | Gravity-defying, magical floating portraits | Fashion, conceptual, fantasy-themed shoots | Eye-catching, imaginative images; interactive process |
| Smoke and Fog Photography | Medium - temporary effects, environmental control | Fog machines, smoke bombs, backlights | Moody, mysterious, ethereal portraits | Dramatic, atmospheric portraits | Creates depth and mood; natural diffusion |
| Bokeh and Shallow Depth of Field | Low - requires lens choice and precise focusing | Fast prime lenses, full-frame cameras | Professional portraits with smooth background blur | Portraits needing subject isolation and beauty | Professional look; eliminates background distractions |
| Silhouette Photography | Low - manual exposure for background | Any camera with manual mode, strong backlight | Dramatic, emotional shapes emphasizing posture | Minimalist, moody portraits | Powerful, timeless aesthetics; minimal equipment |
| Creative Color Theory and Gels | Medium - understanding color and lighting setup | Colored gels, LED panels, editing software | Vibrant, mood-enhancing color portraits | Fashion, creative storytelling, social trends | Unique color effects; emotional storytelling |
| Environmental Storytelling | Medium to High - requires planning and location work | Wide-angle lenses, portable lighting, tripod | Context-rich portraits revealing subject’s story | Documentary, professional and personal portraits | Meaningful, engaging storytelling |
Your Next Creative Shot Awaits
The journey through these creative portrait photography ideas, from the ethereal glow of light painting to the narrative depth of environmental storytelling, is about more than just learning new techniques. It’s about rewiring your creative vision. We've explored how to bend reality with double exposures, craft mystery with silhouettes, and use colorful gels to paint with emotion. Each concept is a tool, a new lens through which to see the world and the unique individuals you photograph.
The most crucial takeaway is that creativity is not a passive trait; it's an active practice. The difference between an ordinary portrait and an extraordinary one often lies in the willingness to experiment. It's about asking "what if?" What if you used a prism instead of a mirror for reflections? What if you combined smoke with creative color gels? The techniques we've covered are foundational, but their true power is unlocked when you start combining them and infusing them with your subject's story.
Turning Inspiration into Action
The next step is the most important one. Don't let this inspiration fade. Choose just one idea from this list that excites you the most and commit to trying it this week.
- Pick Your Concept: Does the technical challenge of levitation photography appeal to you, or does the subtle art of using bokeh to isolate your subject feel more your style? Select one to focus on first.
- Plan Your Shoot: Gather your props. If you chose smoke and fog, you need a fog machine or smoke bombs. For light painting, you’ll need a tripod and a light source. A little preparation goes a long way.
- Embrace Imperfection: Your first attempt at a double exposure might not be perfect. Your light painting might look like a scribble. That's part of the process. Every "mistake" is a learning opportunity that sharpens your skills and often leads to unexpected creative discoveries.
Ultimately, mastering these creative portrait photography ideas will elevate your work from simple snapshots to compelling visual art. It will empower you to create images that stop the scroll on social media, build a powerful brand identity, and capture the true essence of your subjects. Your camera is a storytelling device, and these techniques are your vocabulary. The more you practice, the more fluently you can express your unique vision and create portraits that resonate deeply with viewers. Your next incredible shot is not a matter of chance; it's a matter of choice. Go make it happen.
Ready to explore limitless creative portrait photography ideas without a single piece of equipment? With YourAIPhotographer, you can train a personal AI model on your own images to generate thousands of unique, studio-quality portraits in any style imaginable. Stop dreaming about the perfect shot and start creating it today at YourAIPhotographer.