How to Do Virtual Try-On with YourAIPhotographer
With YourAIPhotographer, you can virtually try on clothes on any of your AI-generated photos. Upload garment images and see how they look on your model instantly. The feature supports batch processing, so you can try on multiple clothing items at once — up to 16 garments in a single session.
Perfect for:
- Fashion design — See how different clothing items look on your model
- Style exploration — Experiment with various outfits and combinations
- E-commerce — Preview how garments appear on different models
- Brand campaigns — Create multiple styling variations quickly
1. Hover Over a Photo and Click Try On
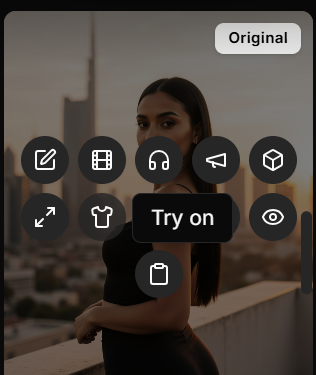
In the Studio tab, hover over any photo you want to use for virtual try-on. You'll see a "Try on" tooltip appear with a shirt icon button.
Click the Try on button to open the virtual try-on modal.
💡 Tip: The Try on button only appears on photos that haven't been upscaled. Make sure to use a photo that's ready for virtual try-on.
2. Upload Garment Images
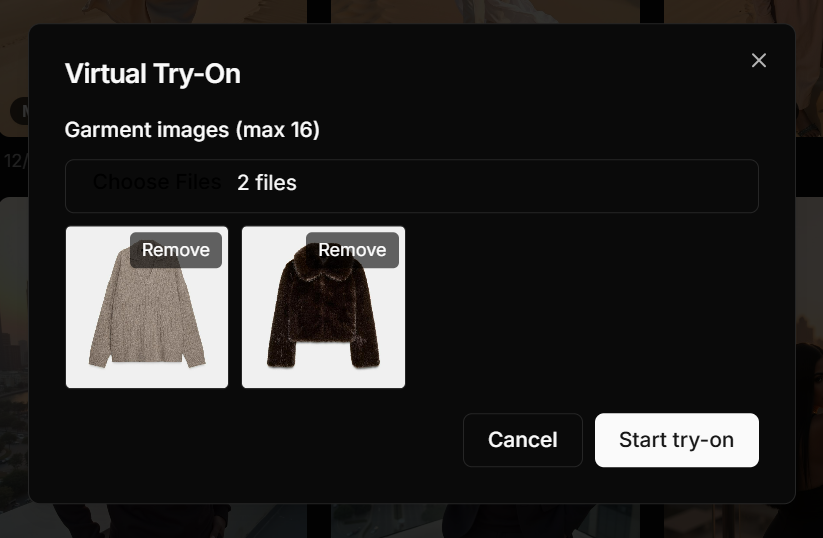
Once the virtual try-on modal opens, you'll see an upload area for garment images.
You can upload either garment-only photos (clothing items alone) or photos of someone wearing an outfit — the AI will automatically extract and apply the clothing to your model photo.
Batch Virtual Try-On
You can upload up to 16 garment images at once for batch processing. This means you can try on multiple clothing items in a single session, saving you time and effort.
To upload garments:
- Click the "Choose files" button (or the file input area)
- Select multiple garment images from your device
- The uploaded garments will appear in a grid preview below
Each garment image will be displayed in a thumbnail. You can:
- Review the garments you've selected
- Remove any garment by clicking the "Remove" button on its thumbnail
- Add more garments by clicking "Choose files" again (up to the 16-garment limit)
Types of Garment Images You Can Upload
You can upload two types of images for virtual try-on:
- Garment-only photos — Images where the clothing item is alone (laid flat, on a hanger, or on a mannequin)
- Outfit photos — Images of someone wearing an outfit — the AI will automatically extract and copy that outfit onto your AI-generated photos
Both options work great! The AI is smart enough to extract the clothing from either type of image.
Best Practices for Garment Images
For the best virtual try-on results:
- Use clear, well-lit photos of the clothing items or outfits
- Ensure the garment or outfit is clearly visible in the image
- Use front-facing views when possible for better results
- If uploading outfit photos, make sure the clothing is clearly visible (not hidden by hands, bags, or other objects)
- Avoid heavily textured or patterned backgrounds when possible
- Images should be at least moderate resolution for better detail
3. Click Start Try-On
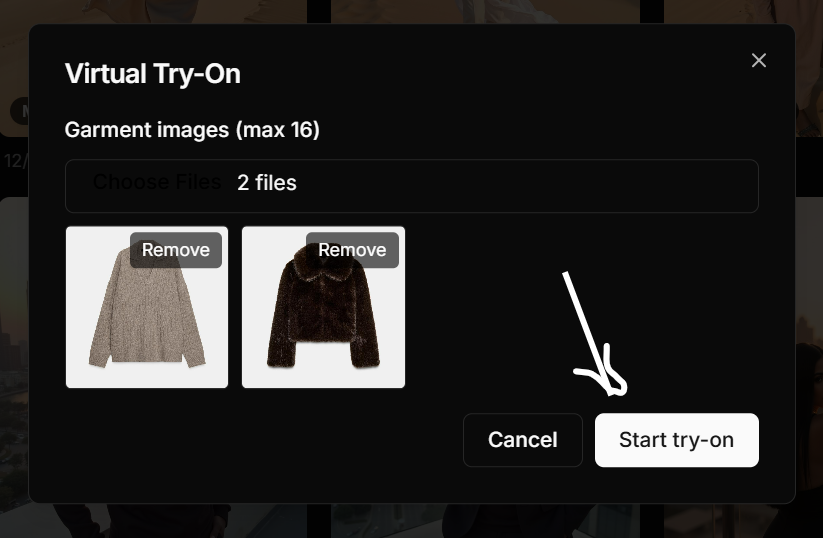
After uploading your garment images and reviewing them in the preview grid, click the "Start try-on" button.
The system will:
- Process each garment image separately
- Create individual try-on jobs for each garment
- Apply each garment to your model photo
You'll see a confirmation message indicating how many jobs have been queued (e.g., "3 job(s) queued" if you uploaded 3 garments).
⚡ Processing time varies depending on the number of garments and server load. Each garment is processed individually, so multiple garments may take a few minutes to complete.
4. View Results in Studio

Once the virtual try-on jobs are complete, your images will appear in the Studio tab.
Each garment you uploaded will have been applied to your model photo, creating separate result images. You can:
- View each try-on result
- Download the images
- Use them for further editing or upscaling
- Compare different garments side by side
The results will be marked with a "Try-on" label, and you can see the original garment image in a small thumbnail overlay on each result.
🧠 Pro Tips
- Use batch processing — Upload multiple garments at once to save time and compare different styles quickly
- Choose good garment photos — Clear, well-lit images of clothing items produce the best results
- Experiment with different styles — Try various clothing types (shirts, dresses, jackets) to see what works best
- Combine with other features — After trying on garments, you can edit the results or upscale them for higher resolution
- Plan your workflow — Since try-on doesn't work on upscaled photos, do your virtual try-ons before upscaling
⚠️ Important Notes
Try-On Works on Specific Photo Types
You cannot use virtual try-on on upscaled photos. Make sure to use a standard photo (not upscaled) for virtual try-on.
The workflow should be:
- Generate or select your photo
- Try on garments you want to test
- Edit or adjust the results if needed
- Upscale the final result for higher resolution
Next Steps
- Learn how to edit images →
- Discover how to use the AI upscaler →
- Explore creating AI photos →