

How to Superimpose Images Like a Pro
Learn how to superimpose images with our step-by-step guide. Master photo blending in Photoshop, free online tools, and mobile apps for stunning results.
Table of Contents
Ever wanted to layer one photo on top of another to create something totally new? That’s superimposing in a nutshell. It’s a fundamental photo editing skill that lets you combine elements from different pictures into a single, cohesive image for everything from art projects to marketing materials.
What Does It Mean to Superimpose an Image
Essentially, superimposing is placing one image over another and blending them together, like a digital collage. This isn't some new-fangled trick, either. The concept goes all the way back to the mid-19th century with the start of photomontage. Photographers would physically cut and paste different photos to build a new scene, a technique called combination printing. You can learn more about this fascinating early art form over on Wikipedia.
Thankfully, we don't need scissors and glue anymore. Today's digital tools make the process much easier, but the core idea is identical: merge different visual elements to create a new reality. It's an incredibly versatile skill you see used everywhere.
Common Uses for Superimposing Images
You've probably seen superimposed images thousands of times without even thinking about it. Here are just a few ways it’s used:
- Artistic Double Exposures: Blending a portrait with a scenic landscape to get that dreamy, almost ghostly effect.
- Surreal Art: Creating impossible scenes, like an astronaut wandering through a desert or a massive cat lounging on a skyscraper.
- Product Mockups: Placing a brand logo onto a t-shirt or a coffee mug to give customers a preview of the final product.
- Social Media Graphics: Layering text, logos, or other graphics onto a background image to make a post pop.
Knowing why you're superimposing an image is just as crucial as knowing how. That’s what separates a simple overlay from a powerful visual story.
This classic technique is also getting a major facelift with modern tech. If you're curious about where things are headed, you should check out our guide on how AI is used in photography. Mastering superimposition gives you a powerful way to bring your creative ideas to life, whether you're going for subtle realism or something completely out of this world.
Superimposing Images with Adobe Photoshop
When you absolutely need pixel-perfect precision for a project, nothing beats Adobe Photoshop. It's the industry standard for a reason. The layer-based system gives you an incredible amount of control, letting you create composites that look completely real. While it might look a bit intimidating at first, the basic process is actually pretty logical.
The whole concept revolves around layers. Just picture them as clear sheets of plastic stacked on top of one another. Your background image goes on the bottom layer, and the image you want to place on top goes on a new layer above it. This setup is the heart of non-destructive editing, which means you can always go back and make changes without ruining your original photos.
Getting this first part right—choosing a solid base image and a compelling overlay—sets the stage for everything that follows.
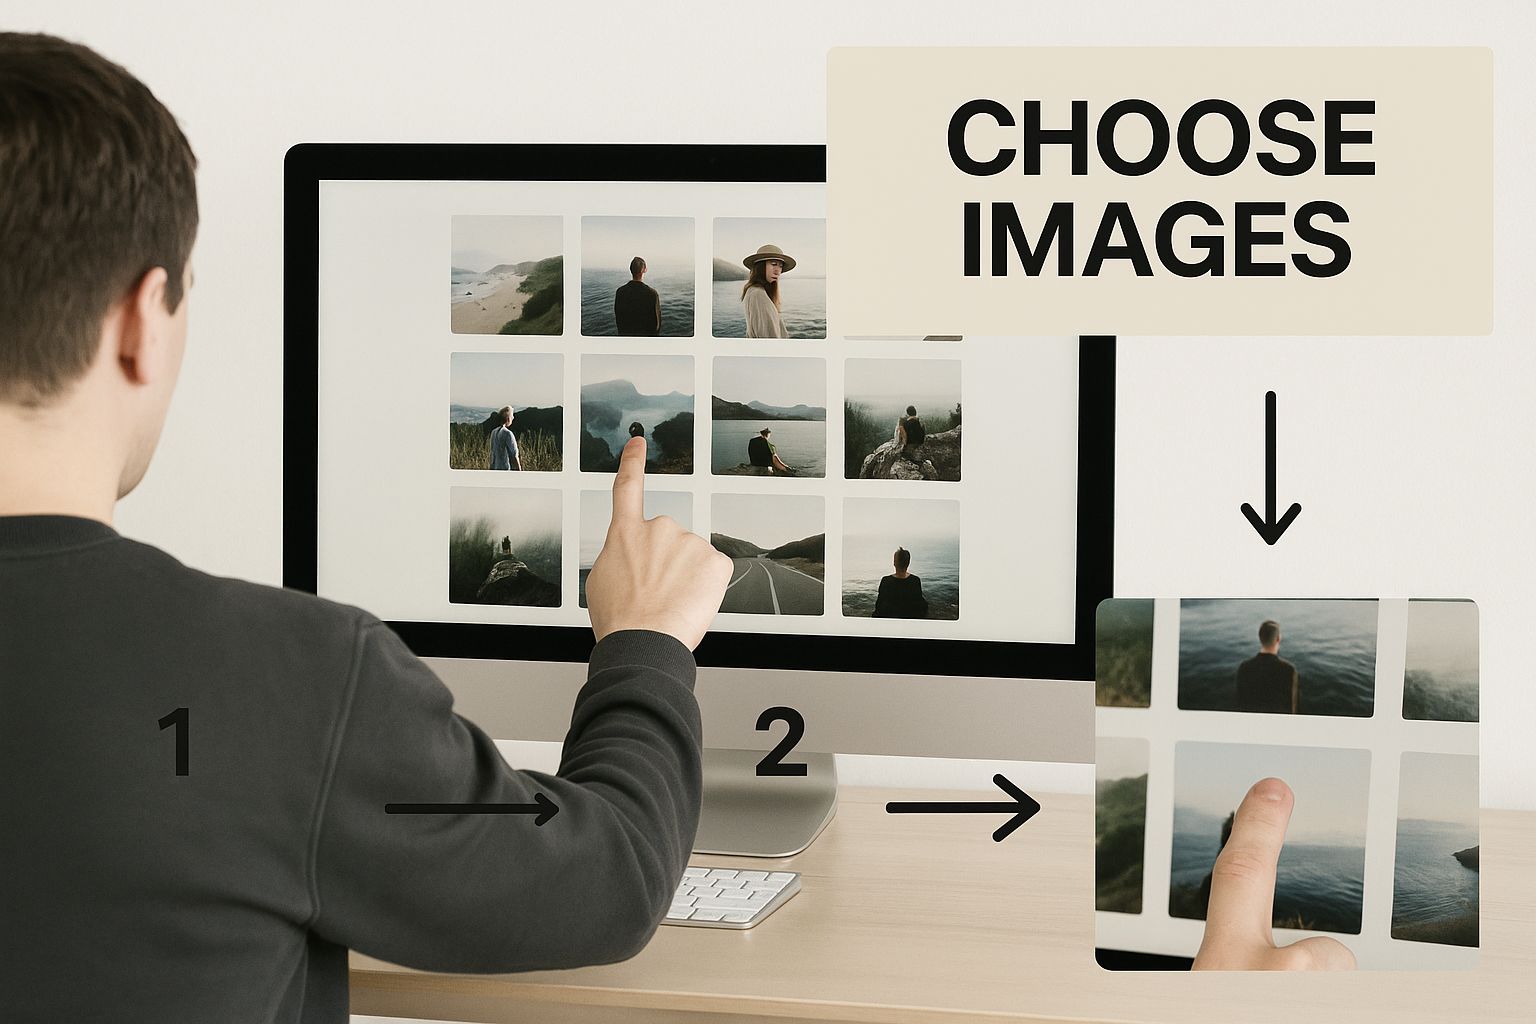
This visual really captures that foundational choice: picking the two images that will come together to create your final piece.
Mastering Layer Masks and Blending
Now for the fun part. The real power move in Photoshop is using layer masks. Instead of permanently deleting parts of your top image with the eraser tool (a classic beginner mistake!), a layer mask lets you paint over areas to hide or reveal them. Painting with black on the mask hides that part of the layer, while painting with white brings it back. It's completely reversible, which is a lifesaver.
A pro tip is to use a soft-edged brush on your mask. This creates a much more natural, gradual transition between the two images. Think about blending a dramatic new sky into a landscape photo—a soft brush will let you feather the edge along the horizon line so it doesn't look like a harsh cutout.
Blending modes are your other secret weapon. These settings completely change how your top layer interacts with the one beneath it. For example, the 'Screen' mode is fantastic for adding glows or light effects, whereas 'Multiply' is perfect for deepening shadows or adding textures.
Don't forget to match your colors. This is a step many people skip, but it's crucial. Two photos shot in different lighting will almost always have different color casts. Learning proper color correction for photos is what separates a good composite from a great one, making everything feel like it truly belongs in the same scene.
Using Free Online Tools to Superimpose Images
You don’t need to shell out for expensive software to create some really compelling superimposed images. There are plenty of powerful, free online tools right in your browser that get the job done without costing a penny. I'm talking about platforms like Canva and Photopea, which have made photo blending ridiculously easy for just about anyone.
It’s easy to take this for granted, but digital imaging has come an incredibly long way. Think about it: the first digital cameras in the 1970s took grainy, black-and-white photos. Now, we all have high-resolution cameras in our pockets, giving millions of us the power to capture and layer images on the fly. It's a massive leap in a relatively short time.
Getting Started with Browser-Based Editors
The great thing about most free editors is how intuitive they are. You just upload your background image and the one you want to place on top. The tool automatically puts them on separate layers, which is the key.
This setup lets you move, resize, and rotate each image on its own until it looks right. It’s perfect for whipping up quick graphics for a blog post or social media.
A feature I find myself using all the time in these tools is the one-click background remover. It takes what used to be a painful, time-consuming task and makes it almost instant. You can pull a person or an object out of its background in seconds.
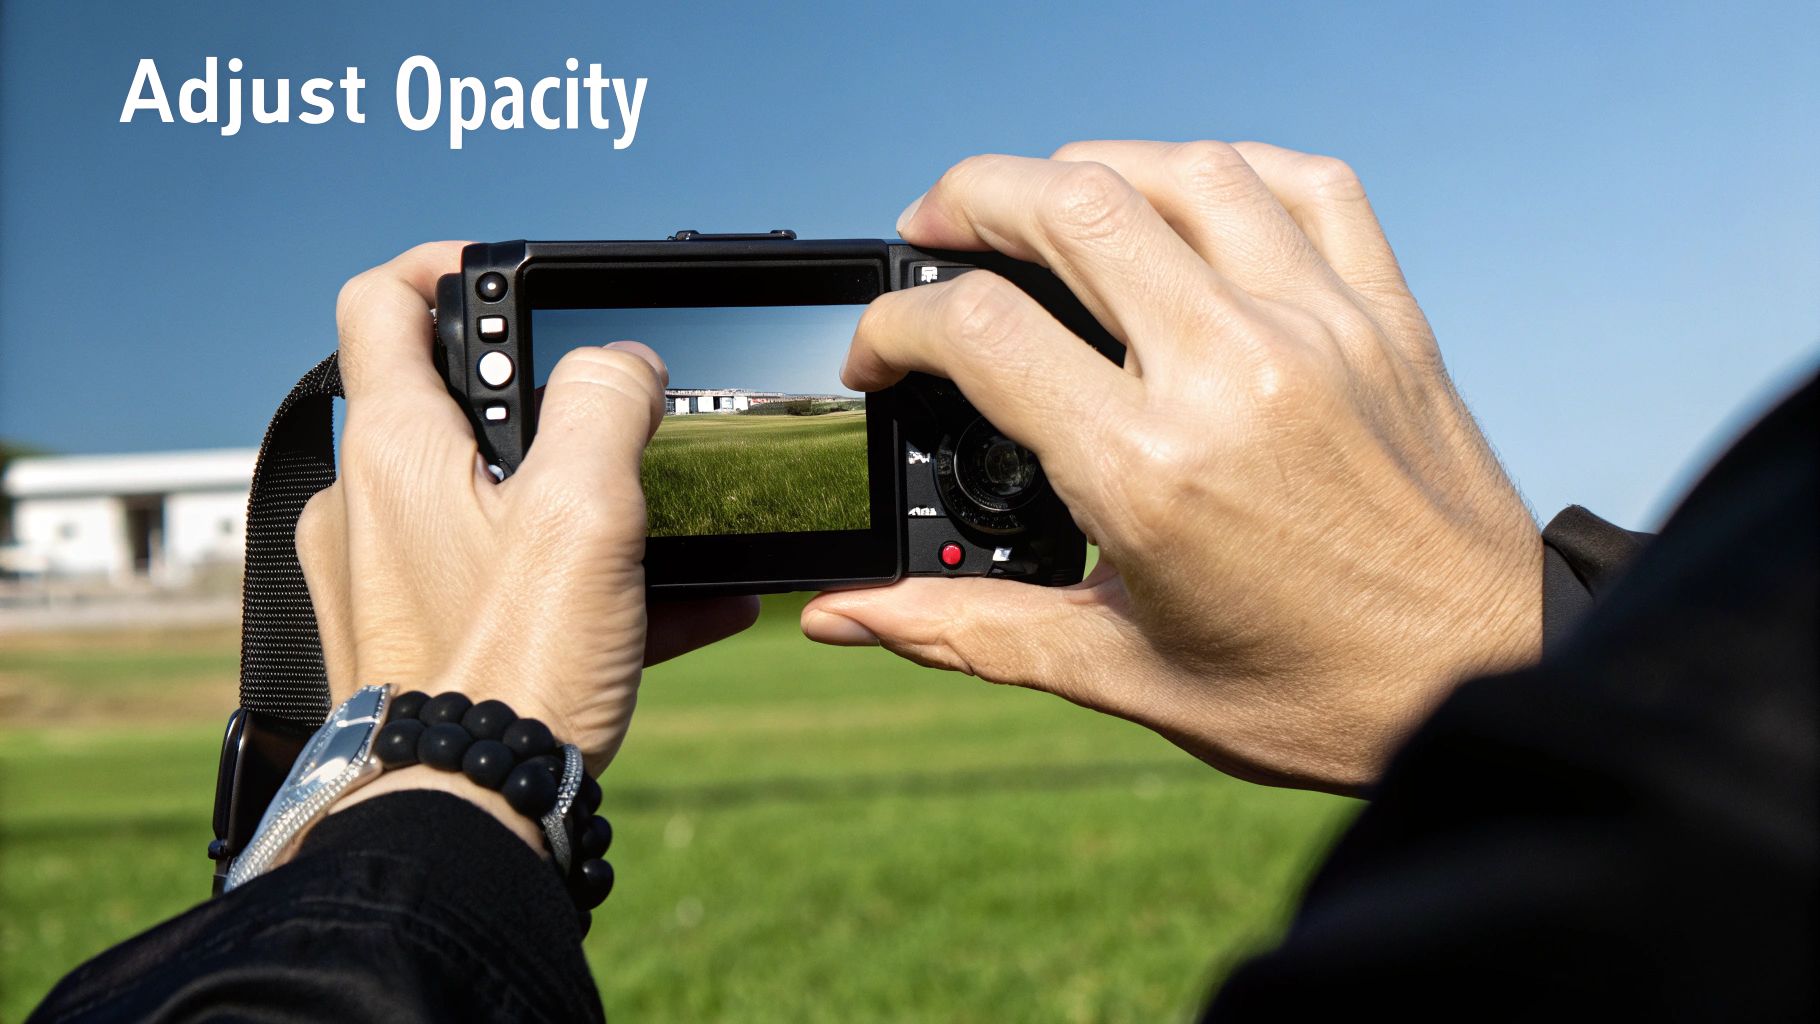
For quick projects, you’re not always chasing pixel-perfect realism. Sometimes, it’s all about speed and impact. The fastest way to blend two images is by simply adjusting the transparency (or opacity) of the top layer. This creates a simple, effective double-exposure look in no time.
Most of these platforms also come packed with filters and effects. These are great for making the colors and lighting of your two images match up, which helps the final composite look much more natural and cohesive. This is a must-do when you're creating things like thumbnails that need to grab attention.
For more on that, you can check out some of our YouTube thumbnail design tips to see how these techniques come into play. Honestly, with the free tools available today, there’s nothing stopping you from producing high-quality work for any project you can dream up.
Creating Overlays on Your Phone with Mobile Apps
You don't need to be chained to a desk to create stunning image composites. Your smartphone is a surprisingly powerful creative tool, and the right apps can help you superimpose images from just about anywhere. This is a game-changer for content creators who need to capture, edit, and share on the fly.
I've spent a lot of time experimenting with different mobile editors, and a few always stand out. Apps like Snapseed, Bazaart, and Picsart are packed with tools designed specifically for layering photos. They turn a potentially tricky process into something intuitive, letting you use simple touch controls—like pinching to resize or dragging to reposition—instead of fiddling with a mouse and keyboard.
Finding the Right Tool for the Job
While all these apps can handle the basics, they each have their own strengths. The best one for you really depends on what kind of look you're going for.
- Snapseed: I love its 'Double Exposure' tool. It’s perfect for creating those dreamy, blended portraits you see all over Instagram, and it's incredibly fast.
- Bazaart: If you want more granular control over your layers, this is your app. It feels a lot like a streamlined, mobile version of Photoshop.
- Picsart: This is my go-to for social media graphics. Its massive library of effects, filters, and stickers makes it easy to create something fun and vibrant that really pops.
Here’s a pro tip from experience: precision is everything on a small screen. Always zoom in close to check the edges of your overlay. Taking an extra minute to refine the blend and avoid that harsh, "cut-out" look makes a world of difference in the final image.
Having this capability in your pocket is just plain freeing. You can cook up unique visuals for your feed or just play around with artistic ideas whenever inspiration strikes. And if you're into creating unique visuals, you can also learn how to create an AI avatar from a photo right from your device. With these tools, quality photo editing is literally always at your fingertips.
Advanced Techniques for Realistic Photo Blending
https://www.youtube.com/embed/sP1YR8ryzYk
Moving past a simple cut-and-paste job is where the real magic happens. The goal is to make someone believe the two separate photos were always meant to be one. To pull this off, you have to obsess over the little details that sell the illusion.
The biggest giveaway is always the lighting. Take a hard look at your main image. Where is the light coming from? Are the shadows harsh and defined, or are they soft and spread out? Whatever you're adding to the scene needs to have shadows that follow the exact same rules.
Harmonizing Light and Color
I see this all the time: a brightly lit person dropped into a moody, dim scene. It just screams "fake." The fix is to use adjustment layers to play with the brightness, contrast, and color of your overlay. Working this way is non-destructive, meaning you can tweak things endlessly until it looks just right.
Think about it logically. If your background has that warm, golden-hour glow, your new element can't look like it was shot under a cool, blue fluorescent light. It will stick out like a sore thumb. A quick color balance or photo filter adjustment can warm it up to match the environment.
Here are a few things I do on almost every composite:
- Add a Subtle Shadow: I create a new layer under my subject, grab a soft black brush on a low opacity, and paint in a small shadow where the object meets the ground. This one small step instantly anchors it to the scene.
- Match Film Grain: If the original photo is a little grainy, a perfectly clean digital element will look out of place. I always add a tiny bit of noise to the new layer so the textures match.
- Blur the Background: Sometimes, adding a slight blur to the background makes the whole image feel more cohesive. It creates depth and naturally draws the eye to your superimposed subject.
Beyond Basic Blending
Superimposing images isn't just a fun digital trick; it has a pretty serious history. Forensic scientists have been using superimposition since the 1930s to help identify human remains by overlaying a photograph of a skull with a picture of a person's face. You can actually read more about this fascinating scientific use over on the NCBI website.
The secret to a believable composite isn't just technical skill—it's observation. Before you even open your editing software, study how light, shadow, and color interact in the real world.
Once you get the hang of these principles, you can start building anything, from fantastical landscapes to surreal portraits. And if you're looking to bring AI into your workflow, you can even learn how to train an AI model to create custom elements for your composites, which opens up a whole new world of creative options.
Common Questions About Superimposing Photos
As you start blending images, a few questions always seem to come up. It's totally normal. Here are some quick answers to the things people ask most, designed to help you get past those common sticking points.
Honestly, one of the biggest challenges isn't the software, but training your eye to see what looks right.
How Can I Make My Superimposed Image Look Real?
The secret to a believable image is consistency. Every element you add has to look like it was there from the start. To pull this off, you need to become a bit of a detective and pay close attention to three key details:
- Light Source: Look at the main photo. Where is the light coming from? The shadows on the object you're adding must fall in the same direction. If they don't, it’s an instant giveaway.
- Color Temperature: Is the original scene warm and sunny, or is it a cool, overcast day? Your added element needs to match that same color tone. A quick color balance adjustment can make a world of difference.
- Perspective: The angle and scale have to make sense. If you add a person to a landscape, make sure they aren't towering over a tree in the distance. Getting the perspective right is crucial for selling the illusion.
Here's a pro tip: adding a very subtle shadow where the new object touches a surface in the base photo will instantly make it feel more grounded and a part of the scene.
What's the Best File Format to Use?
Picking the right file format is more important than you might think. For anything you're putting on the web, JPEG or WebP is usually your best bet. They keep file sizes small without sacrificing too much quality, which helps pages load faster.
But, if your image has any see-through parts—like a logo you've placed over a background—you have to use PNG. It’s the only common format that supports transparency, so you won't end up with a clunky white box around your overlay.
I can't stress this enough: always save a master copy in the software's native format (like a .PSD file for Photoshop). This saves all your layers and edits, so you can easily go back and make changes later without starting over.
Can I Put a Video on Top of a Picture?
Absolutely, but that's where you'll need to switch from a photo editor to a video editor.
You’d use a program like Adobe Premiere Pro, Final Cut Pro, or even the video tools in Canva. In those apps, you just place the video clip on a timeline track directly above your background image. It’s a great way to create some really eye-catching visuals.
Ready to create stunning, unique images without the complex editing? YourAIPhotographer lets you train a personalized AI model with your selfies to generate photorealistic photos in any style you can imagine. Get started and see the magic for yourself at https://youraiphotographer.com.