

Remove Blemishes From Photos for a Perfect Finish
Learn how to remove blemishes from photos with our expert guide. We cover Photoshop, mobile apps, and AI tools for natural, professional-looking results.
Table of Contents
Getting a photo to look just right, without distracting blemishes, has never been more straightforward. We have a fantastic range of tools at our fingertips, from the pixel-perfect precision of manual retouching in Photoshop to the quick-fix convenience of mobile apps. There's even AI for handling big batches of photos automatically.
So, which one is right for you? It really just depends on what you're trying to accomplish, your comfort level with the software, and how much time you've got to spend.
Your Guide to Flawless Photo Retouching
Whether you’re polishing a professional headshot, cleaning up a selfie, or prepping product shots for your online store, a clean and natural-looking image always wins. The key is to enhance the photo, not completely erase the person's character. You want a final image that looks polished but, most importantly, still looks real.
This guide will walk you through the three main ways to get the job done:
- Total Manual Control: We'll dive into professional software like Adobe Photoshop where you have ultimate control over every little detail.
- On-the-Go Convenience: We'll look at powerful smartphone apps that are perfect for quick fixes when you're away from your computer.
- Smart Automation with AI: We'll explore how intelligent tools can automatically remove blemishes from entire photo shoots in just a few minutes.
This isn't just a niche skill anymore. The demand for high-quality, clean images has pushed the global photo retouching market to a projected USD 4.1 billion by 2026. This is largely fueled by e-commerce, where a single, polished product photo can make or break a sale.
Choosing Your Blemish Removal Method
Figuring out the best tool can feel like a tough choice, but it really comes down to a simple trade-off between control, speed, and ease of use. It's also worth acknowledging the world we live in, where things like the prevalence of filtering for picture-perfect social media images have shaped what we expect a "good" photo to look like.
Knowing the strengths of each method helps you work smarter, not harder, and get the results you want every time.
Want to take your images to the next level? Our guide on how to make a photo look professional is a great next step.
To make it easier, here's a quick comparison of the three main approaches. Think of it as a cheat sheet to help you decide which path to take for your next project.
Choosing Your Blemish Removal Method
| Method | Best For | Skill Level | Speed |
|---|---|---|---|
| Manual (Photoshop/Lightroom) | Professional portraits, high-end commercial work, and when you need absolute pixel-perfect control. | Intermediate to Advanced | Slow |
| Mobile Apps (e.g., Snapseed, Facetune) | Quick touch-ups for social media, selfies, and casual photos on the go. | Beginner | Fast |
| AI Automation (YourAIPhotographer, etc.) | Large batches of photos, e-commerce product shots, event photography, and consistent, fast results. | Beginner | Very Fast |
This table should give you a good starting point. Now, let's get into the nitty-gritty of how to use each of these methods to get that flawless finish.
When you need absolute precision and control, there's no substitute for rolling up your sleeves and getting into Adobe Photoshop. For professional photographers and serious hobbyists, manual retouching is where the real magic happens. It gives you the power to remove blemishes from photos without destroying the very thing that makes a portrait feel real: natural skin texture.
The goal isn't to create a plastic-looking, flawless face, but to make careful, deliberate adjustments that clean up distractions while keeping the person's character intact. Photoshop gives you an entire toolkit for this, and knowing which tool to grab for which job is half the battle.
This flowchart can help you decide which path to take, whether you're doing a deep dive with manual editing, need a quick fix on your phone, or are looking to automate the process.
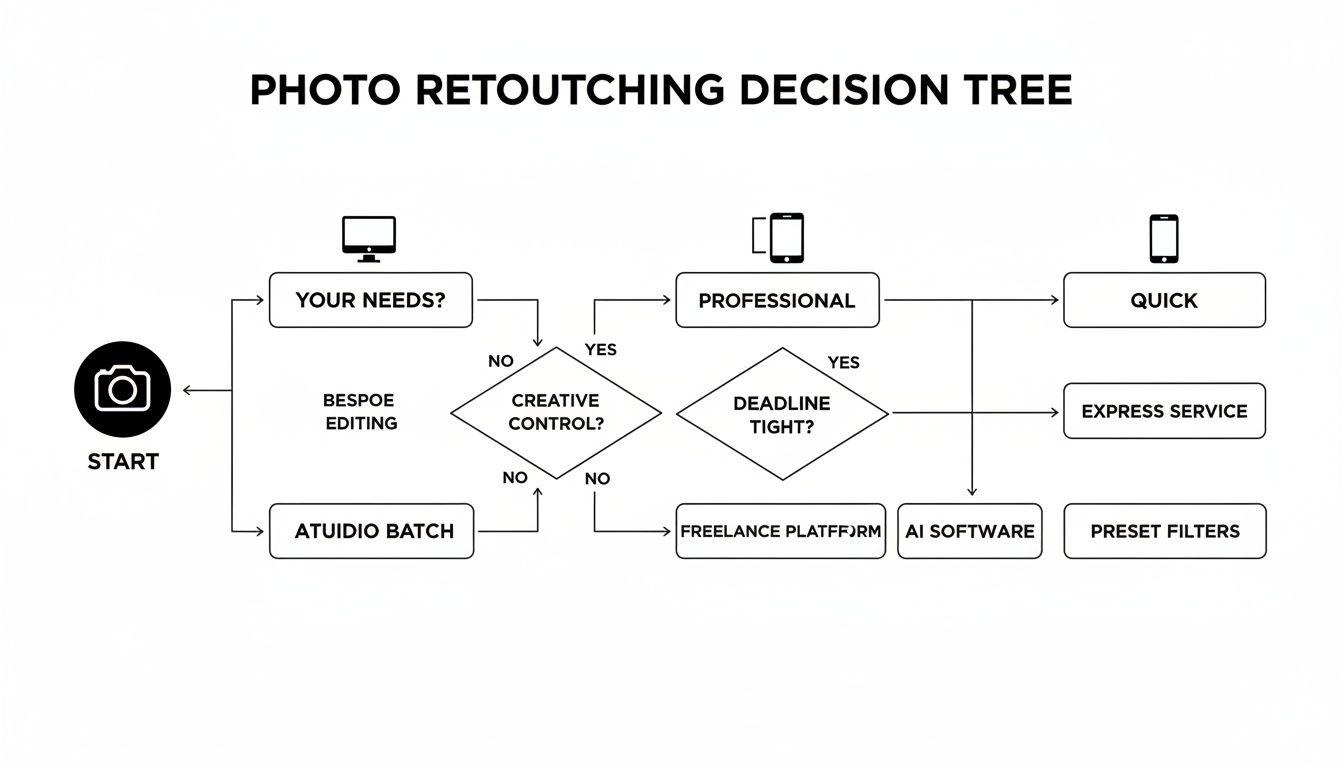
As you can see, the right method really just depends on your final goal and how much time you have on your hands.
The Essential Photoshop Toolkit
At the heart of manual blemish removal in Photoshop are a few workhorse tools. I think of these as the core of any retouching workflow.
- Spot Healing Brush: This is your go-to for small, isolated spots on relatively clean skin. Just click, and Photoshop intelligently samples the surrounding pixels to make the blemish disappear. It’s fast, simple, and perfect for that first pass.
- Healing Brush: When the Spot Healing Brush gets confused by nearby textures or edges, the standard Healing Brush gives you back control. You manually pick your source point (Alt/Option-click) and then paint over the imperfection. This is great for trickier areas where you need to be more deliberate.
- Clone Stamp Tool: This is the most literal of the bunch. It copies pixels exactly from one area to another without any smart blending. I use this when I need to rebuild a precise pattern or texture, like along a hairline or fabric, where the healing tools might create a mushy result.
These tools are a big reason why the photo editing software market is projected to grow by USD 606.1 million by 2029. Even dominant platforms like Photoshop are constantly evolving, now incorporating AI-driven features like Neural Filters that can automate blemish removal with surprising skill. You can dig into more photo editing software market growth stats on Technavio's report.
Pro Tip: I can't stress this enough: always do your retouching on a new, blank layer. Set your tool's sampling option to "Current & Below." This non-destructive approach means you're never damaging the original photo. You can easily erase a mistake, lower the layer's opacity to tone down the effect, or delete it entirely. It's a total lifesaver.
For Next-Level Results: Frequency Separation
If you want to achieve that truly high-end, natural look you see in magazines, you need to learn Frequency Separation. It sounds way more complicated than it is.
At its core, the technique separates the skin's texture (the fine details, or "high frequency") from its color and tone (the broad shapes, or "low frequency") onto two separate layers.
Why is this so powerful? It lets you:
- Work on the color/tone layer to smooth out blotchy redness or uneven skin tones without blurring out a single pore.
- Jump over to the texture layer to remove tiny blemishes, stray hairs, or wrinkles without messing up the underlying color.
By editing texture and tone independently, you completely avoid that fake, "overly smoothed" look that's a dead giveaway of amateur retouching. This technique is also a perfect companion to the skills discussed in our guide on advanced color correction for photos. Honestly, mastering Frequency Separation is what takes your retouching from good to truly exceptional.
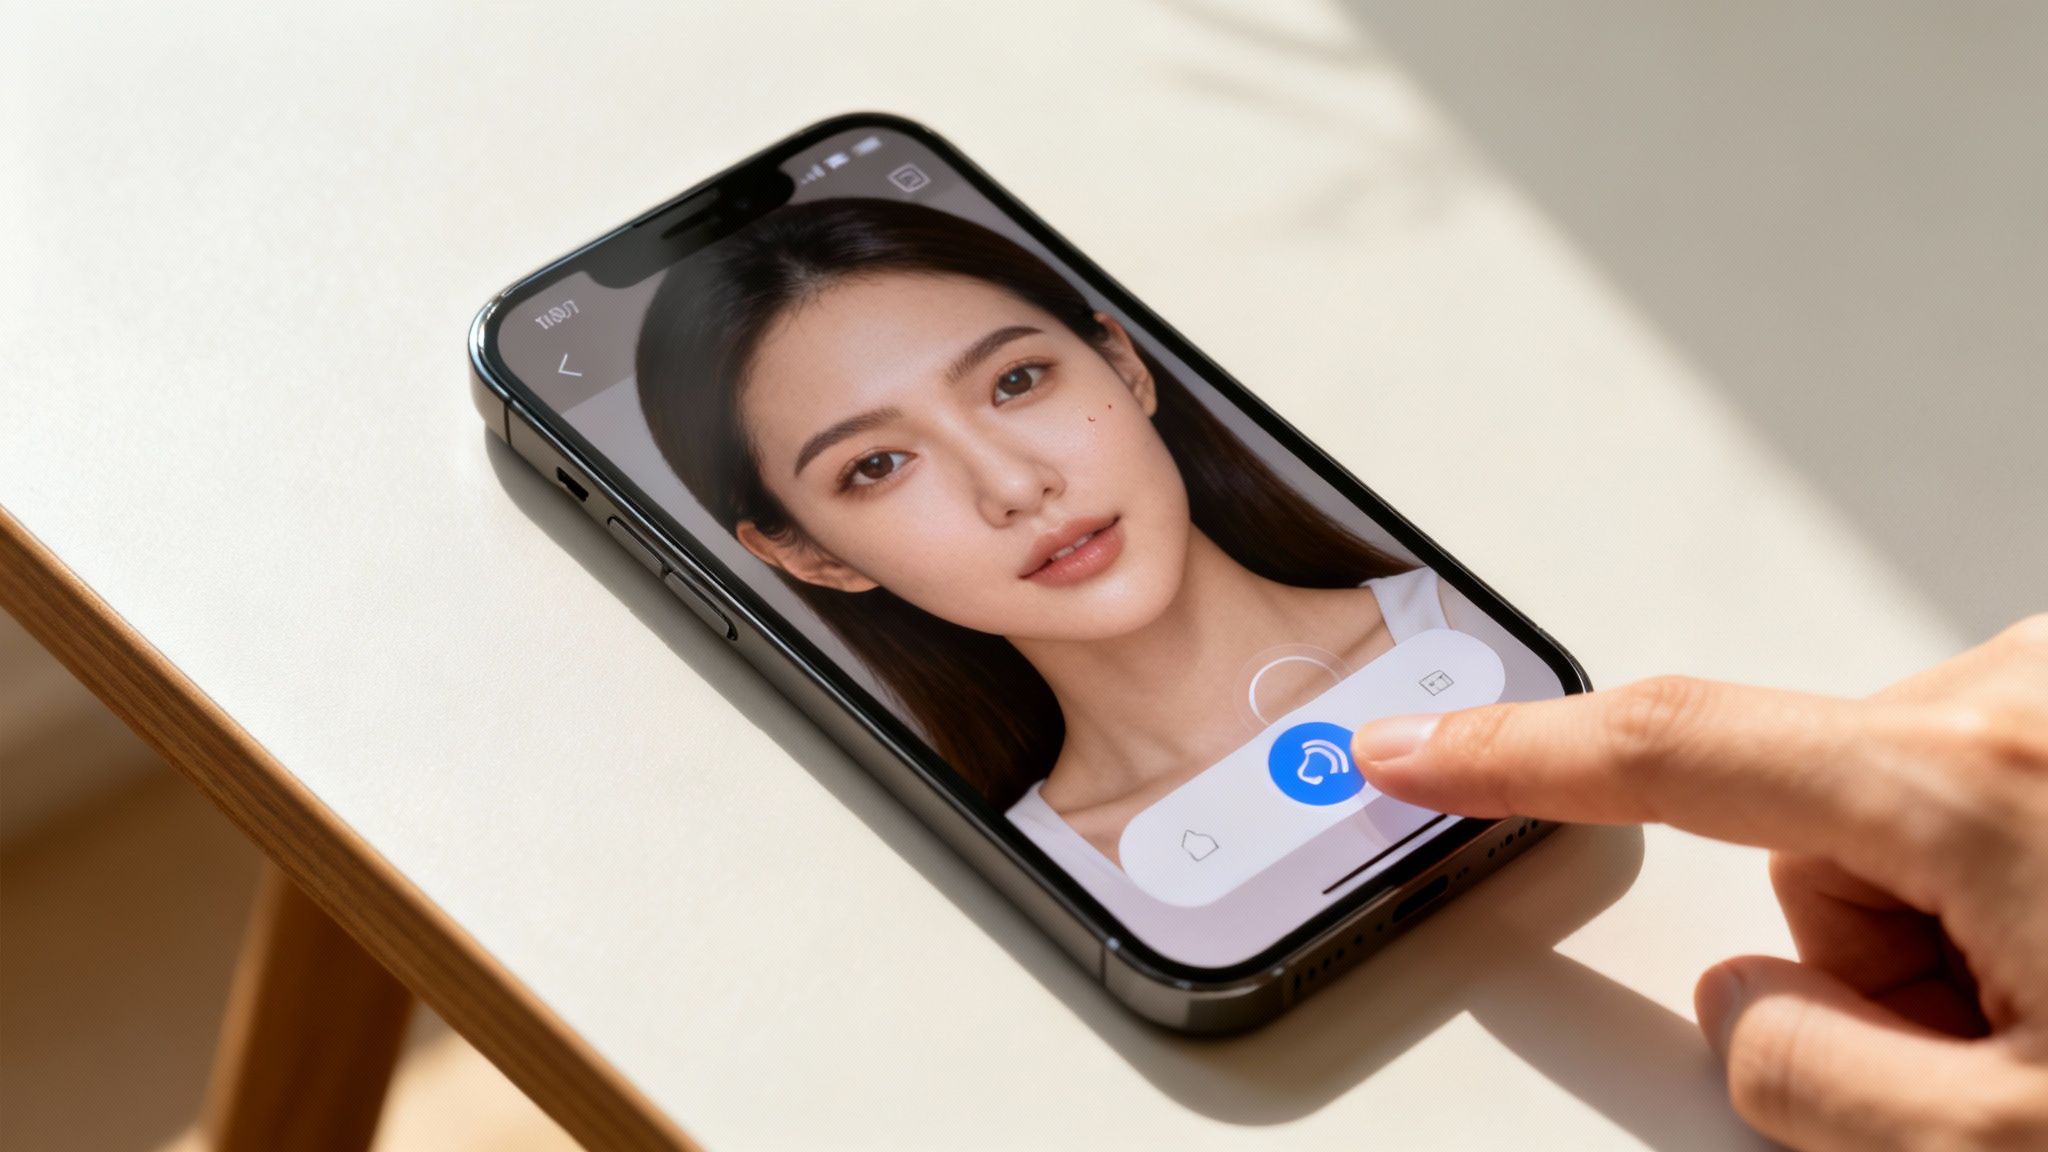
Quick Blemish Fixes on Your Phone
Let's be real—not every photo needs the full Photoshop treatment. Sometimes you just need to clean up a quick selfie for Instagram or a picture you're about to text a friend. This is where mobile editing apps are lifesavers, giving you powerful tools right in the palm of your hand.
The best part? You don't need to be a pro retoucher to get great results. Most of these apps are designed to be intuitive. With just a few taps, you can make minor imperfections disappear and have your photo ready to share in no time.
Top Apps for On-the-Go Retouching
While the app store is flooded with options, a few have earned their place as go-to tools for a reason. They offer a fantastic mix of powerful features and dead-simple interfaces, making them perfect whether you're a total beginner or have been editing photos for years.
Here are a few I consistently recommend:
- Snapseed: This free app from Google is a true workhorse. Its "Healing" tool is brilliant for quickly tapping away small spots and other distractions without any fuss.
- Facetune: Famous for its selfie-centric features, Facetune gives you incredibly precise tools for smoothing skin and zapping blemishes. If portraits are your main thing, it’s hard to beat.
- Built-in Phone Editors: Seriously, don't sleep on the tools that came with your phone! Both the iOS Photos app and Google Photos have surprisingly good spot removers that handle simple fixes beautifully.
Many of these apps are now packing some serious AI heat. For example, Adobe's mobile apps, like Lightroom Mobile, feature a Generative Remove tool that can erase anything from a stray pimple to an entire person from your shot. It brings desktop-level power right to your phone. Of course, a great edit starts with a great photo, and our guide on how to take cute selfies can get you started on the right foot.
A Quick Look at Snapseed's Healing Tool
If you’re looking for a simple yet effective tool, Snapseed's Healing brush is a perfect example of mobile blemish removal done right. It just works.
All you have to do is pinch-to-zoom in on your photo, tap the blemish you want to remove, and watch it vanish. The app intelligently samples the surrounding area to replace the spot with a patch of clean, matching skin texture. It's that easy.
Here's a pro tip for mobile editing: always zoom in as close as you can get to the blemish. This is the secret to a natural-looking fix. It ensures you're only targeting the tiny imperfection, not the healthy skin around it, which is how you avoid that dreaded blurry or smudged look.
Best Practices for Mobile Edits
Editing on a small screen has its own set of rules. To keep your photos from looking overly processed or "plastic," a light touch is everything.
First off, dial back the intensity. Most apps have a slider that controls how strong the effect is. Starting at 50% intensity is usually a good bet for a natural look. You can always add more if you need to.
Also, remember to constantly zoom out to check your work. An edit that looks perfect when you're zoomed in at 200% might look strange and obvious when you see the whole picture. Finally, lighting is your best friend. A well-lit photo is always easier to edit because harsh shadows can hide imperfections or make them look worse than they are.
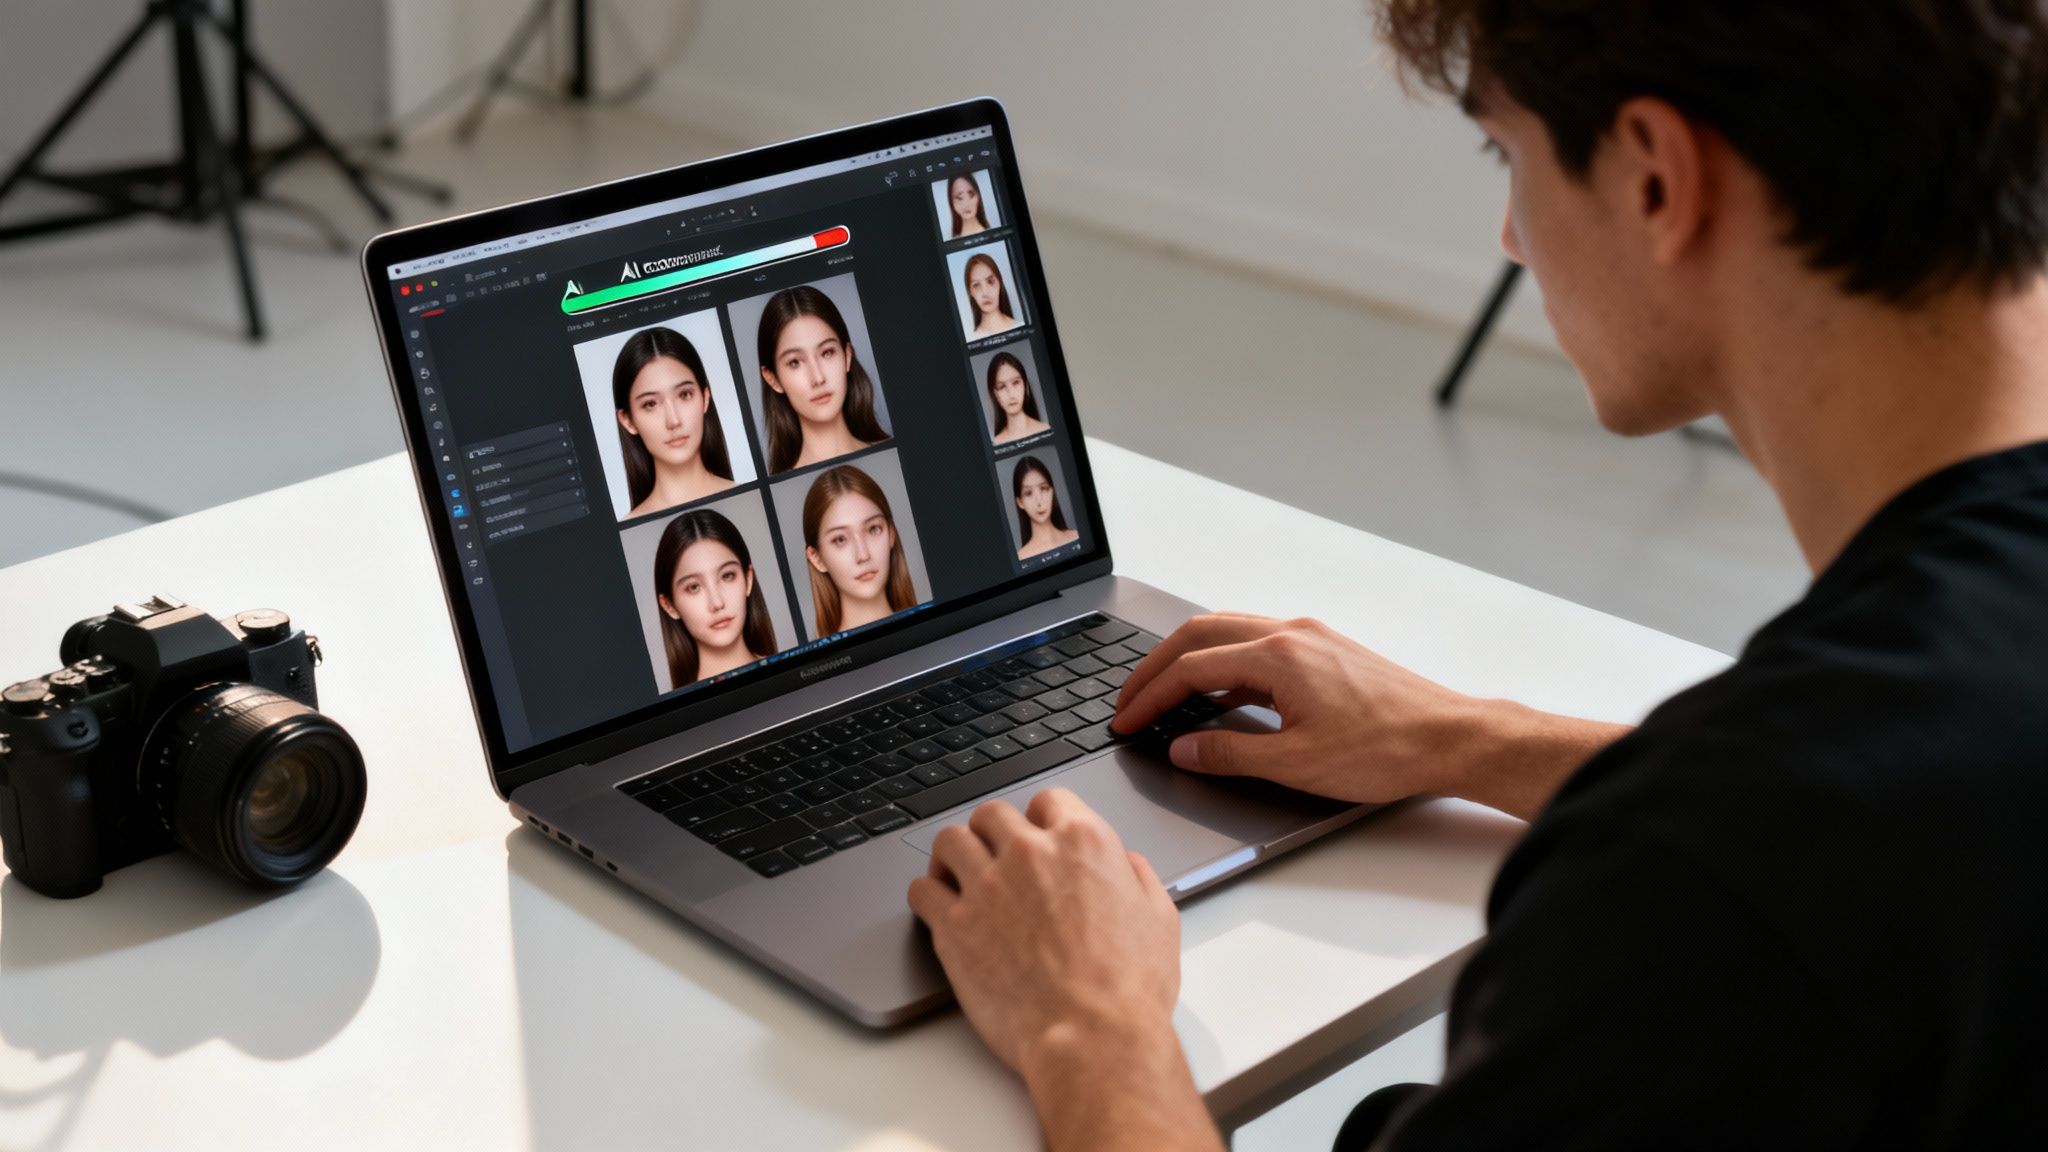
Using AI for Automated Blemish Removal
Think about editing an entire wedding album—hundreds of photos. Now imagine correcting every minor blemish on every single shot in minutes, not days. That’s not a far-off dream; it’s what AI-powered photo editing makes possible right now. For anyone who deals with a high volume of images, like event photographers or e-commerce brands, AI completely changes the game.
This is a world away from the click-by-click process of manual retouching. Instead, smart algorithms scan a photo, pinpoint temporary imperfections like pimples or stray hairs, and intelligently remove them. The best part? They know to leave permanent features like freckles and beauty marks alone. It’s a huge time-saver that delivers surprisingly consistent results across large batches of photos.
How AI Editors Transform Your Workflow
Tools like Luminar Neo or specialized Photoshop plugins are built from the ground up for speed and efficiency. They rely on machine learning models that have been trained on millions of images, so they have a deep understanding of what a blemish looks like versus natural skin texture. This allows them to pull off complex edits with a simple click or a single slider, applying those changes intelligently across an entire gallery.
The impact is massive. The market for image editing software, which is increasingly driven by these AI features, is expected to jump from USD 1.37 billion to USD 2.83 billion by 2034. Why the surge? Because AI can slash the time it takes to fix blemishes by as much as 80%. That’s a game-changer for creators on platforms like TikTok where a polished look is everything. You can find more on this market growth at Precedence Research.
Many of these tools are designed to be incredibly straightforward. They give photographers the power to achieve professional-level results without needing to be an expert in traditional, time-consuming retouching techniques.
The Pros and Cons of AI Retouching
While the benefits are obvious, it’s good to have a realistic perspective. It helps to know where AI truly excels and where it might still need a bit of human guidance.
Key Advantages of Using AI:
- Serious Speed: Processing whole folders of photos at once is easily its biggest selling point.
- Rock-Solid Consistency: AI applies the same rules to every photo, which creates a uniform look across an entire series—essential for professional work.
- Super Simple: Most AI tools are built for ease of use, with intuitive controls that anyone can pick up quickly.
But AI isn't infallible. For those really important, high-end portraits where every pixel counts, you might find the AI gets you 95% of the way there. That last 5%—catching a subtle mistake or making a creative choice—often still calls for a quick manual fix in something like Photoshop. For a deeper dive, check out our guide on the possibilities of AI image enhancement.
A great workflow that many pros have adopted is a hybrid approach. They let the AI do the heavy lifting with a bulk edit first. Then, they do a quick final pass to make any small, manual tweaks. This method gives you the best of both worlds: the incredible speed of automation and the fine-tuned precision of a human eye.
Common Retouching Mistakes to Avoid
Learning the right tools is only half the battle. Knowing what not to do when removing blemishes is what truly separates a good retoucher from a great one. It’s surprisingly easy to go too far, turning a beautiful, natural portrait into a plastic-looking mess that screams "edited."
The real goal is to enhance, not erase. Avoiding a few common slip-ups will make a world of difference in your final images.
One of the biggest giveaways of an amateur edit is over-smoothed skin. When you completely blur out every last pore and fine line, you strip away the natural texture that makes someone look real. This creates a flat, doll-like effect that’s just plain fake. This usually happens when the blur or smooth tool is cranked up way too high.
Creating Mismatched Textures
Another dead giveaway is a texture mismatch. This is what happens when you use the Clone Stamp or Healing Brush to cover a blemish but grab your sample from an area with totally different skin texture. Think about it: using the super-smooth skin from a cheek to patch a spot on the forehead, where pores are often more visible, will create a weird, unnatural-looking blotch.
The fix is simple, but it takes discipline. Always sample from an area as close as you can get to the spot you're fixing. This ensures the texture, lighting, and color are already a close match, making your correction blend in perfectly.
A Pro Retoucher's Mindset: "When I see images with dust spots, it tells me the photographer either didn’t care enough to remove them, or, didn’t see them to remove them. Either way, it is a sign of an unkempt image." This hits on a key point: details matter. The same principle applies to skin retouching—the little things add up to a professional result.
Forgetting the Big Picture
It’s so easy to get lost when you’re zoomed in to 300%, hunting down every single tiny imperfection. But this tunnel vision can lead you to make changes that look awful when you finally zoom out. A correction that seems perfect up close might just be a blurry, obvious smudge when you see the photo at a normal size.
To keep yourself grounded, build these habits into your workflow:
- Work Non-Destructively: Get in the habit of doing all your retouching on a new, separate layer. This is your safety net. You can dial back the opacity, make adjustments, or just delete the layer if you mess up, all without touching your original image.
- Lower Your Opacity: Never use your retouching tools at 100%. Start with a much lower opacity, somewhere between 30-60%, and build the effect up slowly. This gives you a much more subtle, believable result.
- Zoom In and Out constantly: Dive in close to make the precise fix, then immediately zoom back out to see how it looks in the context of the whole face. Do this again and again. It feels tedious at first, but it’s a non-negotiable step for good editing.
Finally, a classic rookie mistake is removing things that are part of who the person is. Leave moles, beauty marks, and most freckles alone unless the client has specifically asked you to remove them. These aren't blemishes; they're part of what makes someone unique. Wiping them out can make the person look like a stranger, which is never the point of good retouching.
Common Questions About Blemish Removal
When you're new to retouching, a few questions always seem to come up. Nailing down the answers early on will save you a ton of frustration and help you get those clean, professional-looking results much faster.
One of the first things people ask is, "Should I remove every single imperfection?" The answer is almost always a hard no. Great retouching is about getting rid of temporary distractions—think pimples or minor redness—not erasing the permanent features that make a person unique. Things like beauty marks, freckles, and even some scars are part of who they are and should usually stay put.
Another classic problem is the blurry or smudged look that can happen after an edit. This is a dead giveaway that your tool's brush was either too big or too soft. The trick is to use a small, precise brush that's just a tiny bit larger than the blemish itself. This way, you're only working on the problem area and leaving the surrounding skin texture perfectly intact.
Choosing the Right Tool for the Job
So, what's the best tool to use? Honestly, it depends entirely on what you're trying to do.
- For that one crucial portrait where every last detail has to be perfect, nothing beats the control you get with manual editing in Photoshop.
- For a quick selfie fix before you post it online, a mobile app like Snapseed has all the power you'll need.
- If you're staring down a mountain of photos from an event or for an online store, AI tools are your best friend. They offer a level of speed and consistency that you just can't get by hand. Seeing how you can create AI photos really puts into perspective how much time automation can save.
A lot of pros, myself included, use a hybrid approach. I'll often let an AI tool do the initial pass, which takes care of about 80% of the work. Then I'll jump in with my manual tools for those final, fine-tuned adjustments.
In the end, learning which method to use and when is a skill you build with experience. Don't hesitate to play around with different tools to discover what fits your personal workflow and editing style.
Ready to skip the tedious manual work? With YourAIPhotographer, you can generate flawless, studio-quality portraits and headshots in seconds. Just upload a few photos and let our AI create stunning, blemish-free images for you. Try it now at youraiphotographer.com.